Bolt Carrier Group Coatings: What’s the Difference? (4 Types)

So, you’re working on building or upgrading your AR-15. Everything is going great, until you are faced with one issue. Which coating is best for your bolt carrier group?

There are actually quite a few more options than most people realize. However, it can be pretty confusing trying to pick one of them. In this article, we will talk about some of the available coatings and the differences between them.

We will also make recommendations about when to use which coating.

Let’s take a look!

Phosphate Coating

We will start with the most common coating. Phosphate coating, also known as manganese phosphate coating, phosphating, and Parkerizing, is a pretty simple process. The bolt carrier group is placed in phosphoric acid and heated up to around 200 degrees Fahrenheit.

This coating is extremely common because it is inexpensive and durable. It is used in military rifles, which increases its popularity, but also guarantees its durability. Phosphate coated bolt carrier groups will be very resistant to heat, wear, and corrosion. They will usually be black in color.

However, it does have a few shortfalls. Phosphate coated bolt carrier groups have more friction, so they will require more lube to work well. They are also more difficult to clean.

Nickel Coatings

The next coating we will talk about is the various nickel coatings. These have a variety of names, some of which are nickel boron, nickel boron nitride, and NP3.

This process is slightly more difficult. It is accomplished through electroless nickel plating. Basically, there’s a chemical technique that deposits a layer of a nickel material on the metal of the bolt carrier group.

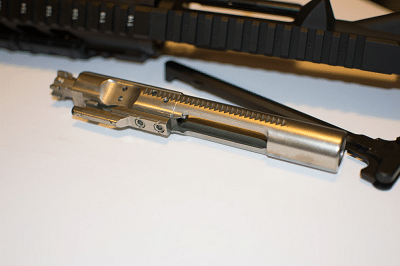
The result of this process is a bolt carrier group that has almost no friction. As a result, it doesn’t require much lube and is very easy to clean. They are also very sleek looking, as they are usually a shiny silver. However, the nickel coatings are not nearly as durable, and are more expensive than the phosphate coated ones.

Nitride Coatings

Nitride coatings, such as black nitride and Melonite, are very tough bolt carrier groups. This finish is accomplished through a process called ferritic nitrocarburizing. This process requires a pretty high level of chemical knowledge, but we will attempt to give you the down and dirty.

Basically, nitrogen and carbon are diffused into ferrous materials at an extremely high temperature. It requires a salt bath, but the metals undergo a reaction that creates multiple layers on the surface.

What you need to know is that nitride coated bolt carrier groups are extremely hard and durable. They are similar to phosphate coatings in terms of durability, but are slightly easier to clean.

Titanium Nitride

I know what you’re thinking. Isn’t titanium nitride a nitride coating? The answer is no. Just to make all of this even more confusing, titanium nitride is completely different than the other nitride coatings.

Titanium nitride coatings are created through a process called vapor deposition. Once again, this requires some chemical knowledge.

Titanium is changed from a solid to a gas and reacted with nitrogen in a vacuum, which creates very thin film.

A bolt carrier group that is coated with titanium nitride is gold in color, which is awesome.

However, they are also very resistant to corrosion, and are extremely smooth.

Similar to nickel coatings, titanium nitride is very easy to clean, and doesn’t require much lube.

Also similar to nickel coatings, titanium nitride bolt carrier groups are pretty expensive.

Titanium nitride is a better choice than nickel boron though, because it is much more durable.

Recommendations

For most applications, phosphate coated bolt carrier groups are a good choice. They are durable and dependable.

If you are looking for the best overall bolt carrier group, look for a titanium nitride one. However, if you ever might have to be concealed, such as in a tactical or home defense situation, you definitely want to look elsewhere, as the titanium nitride coated bolt carrier groups are a very shiny gold.

If you are building a show weapon, you probably want something that is nicer looking. In those circumstances, a titanium nitride or nickel coating is going to be your best bet.

Similarly, if you are looking for a coating that will not require much lube, titanium nitride and nickel coatings will be your best bet. Nickel will be less expensive, but less durable.

If you just want something tough and durable, check out the nitride coatings. They are very similar to phosphate coatings, but are easier to clean.

No matter which direction you choose, make sure you stick to quality brands. There may be cheaper options out there, but keep in mind that you usually get what you pay for.
Should I Build or Buy an AR-15? Which is Better?

The AR-15 is obviously an extremely popular weapon, and as I’m sure you’re aware, there are thousands of parts available. Due to how easy it is to do, building AR-15s is an extremely common trend these days.

However, is it actually worth it to build your own AR-15, or are you better off just buying one? In this article, we will go over some of the pros and cons of building and buying an AR-15 and make some general recommendations about what we would do if we were in your shoes.

should you buy or build an ar15

should you buy or build an ar15

Buying an AR-15

The Pros of Buying An AR-15: 

  • Easiness
  • Guarantee
  • The Warranty
Buying An AR-15

Buying An AR-15

When you buy an AR-15 from a manufacturer, it really couldn’t be any easier. You walk into a gun store and walk out with a completely functioning rifle. You don’t have to know each and every internal part, and you don’t have to make any decisions, other than which manufacturer you like.

When we say the guarantee, we mean the guarantee that everything will work exactly as designed. The internal parts will all fit together and work flawlessly.

Sometimes, internal parts from different manufacturers may not work together exactly as they should. Buying an AR-15 gives you the ease of purchase, since you know it will work. If you aren’t too familiar with the AR platform, it can be very nerve wracking trying to build an AR-15.

Another pro is the fact that most manufacturers back their products with some type of warranty, which you will not get if you are building your own AR-15.

The cons of buying an AR-15

  • it is going to be very simple, and it may be a little overpriced

When you buy an AR-15, you are getting a very basic rifle. More than likely, everything about the weapon will be very simple. While this isn’t necessarily a bad thing, it is something to keep in mind.

Manufacturers tend to overcharge when they sell a fully put together AR-15. You could build a very similar AR-15 for much less money, but it is going to be more difficult and time consuming for you. How much is the assembly time worth to you?

What About Building an AR-15

The Pros of Building an AR-15:

  • Customization
  • Saving money
  • Complete understanding of your weapon
Building an AR-15

Building an AR-15

When you build an AR-15, you can completely customize every single part of it. This allows you to fine tune it to be exactly as you like it. You can customize every inch of it to fit your needs.

Building an AR-15 may also save some money. When you buy the parts and assemble them yourself, it saves money as opposed to buying a full weapon.

It also will give you a complete understanding of your weapon. You will know each and every inch of the weapon, because you put it all together. You know exactly what parts are where, because you ordered all of them.

It is also worth mentioning that it is possible to get an unregistered weapon if you build an AR-15, if you start with an 80% lower receiver. Some states have laws preventing this, but it is worth looking into.

The cons of building an AR-15:

  • Time consuming
  • Requires a good understanding of the weapon system

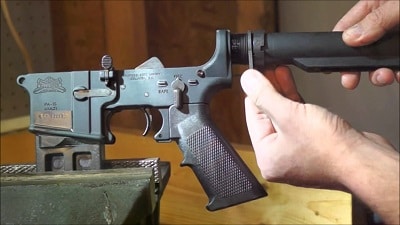
There are some aspects of building an AR-15 that are great. With the exception of the lower receiver, you can buy any part online, get it shipped to your house, and put the weapon together in the comfort of your own home. However, you are going to have to put all of those parts together. It will take you some time.

If you don’t understand the AR-15 weapon system well, it may be a little overwhelming trying to build one. There are a pretty decent number of parts that are involved, so you really need to have a full understanding of the weapon before trying to build your own.

Building an AR-15 also requires some basic mechanical skill and a little bit of patience. It can be very frustrating, especially when parts don’t fit together the way they’re supposed to. Best scope for AR-15 is most important part when you build ar15

Recommendations

If this is going to be your first AR-15, we recommend simply buying one. Buying an AR-15 will give you a complete, working weapon that you can begin to shoot and understand. If you were to buy the parts to build an AR-15 having never seen the inside of one, it is going to be very difficult for you.

Buying your first AR-15 also allows you to figure out exactly what you like in your weapon. This will make an AR that you build even better, because you’ll have more experience with the weapon system. Buy your first AR-15, and build your next to fit you exactly.

If you are going to be doing any competitive shooting, you absolutely should build your rifle.

If you are just a casual shooter, buying an AR-15 will likely be good enough, but it may be more enjoyable and slightly less expensive to build one.

For the hunters and the outdoorsmen, either way will work. Building will allow you to customize the weapon more, but buying an AR-15 will be just fine as well. The choice is really up to you.

If you are trying to get an AR-15 as inexpensive as possible, you should build one.

If you’re short on time, you should buy an AR-15. Building one can be very time consuming.

Conclusion

Whether you buy or build an AR-15, you really can’t go wrong. It is a great weapon system that can do many different things.

Building an AR-15 allows you to fully customize the weapon while saving you a little money, but it requires some knowledge of the weapon and time to put it together. Buying an AR-15 can be slightly more expensive, but is a much easier purchase to make for most people.

It is also worth mentioning that if you buy an AR-15, you can always make upgrades and changes to it as you go. Or, if you take our advice from before, buy your first AR-15 to figure out exactly what you want your weapon to do, and then build your next one.

Estimating How Much Meat From A Deer Will Yield

When hunting, it is important to be able to estimate how much meat a deer will yield before killing it. This is for multiple reasons.

One: You are only allowed to kill so many deer per season, so if you are trying to provide enough food for your family, you need to make sure the deer you are killing will provide enough.

Two: It costs money to get a deer processed by a butcher, so you want to make sure you are getting enough meat for the money that it is costing you.

Three: It takes time to field dress the deer and carry it back to your vehicle, so you want to make sure your time is used on a deer that is worth it.

How Much Meat from a Deer Will You Get? 

Due to these factors having a good estimate of how much meat is important before killing the deer. The factors that go into estimating how much meat from the deer will yield is mostly based on the size or weight of the animal.

With practice you can look at an animal and know close to what it weights. Then you can figure out how much it will weigh after field dressing, which you can then use that number to figure out how much meat it will provide.

After reading this article, you will know what you need to consider to figure out how much a deer weights and then you will be able to have a rough idea of how much meat it will produce for you and your family.

Guessing Weight Based on Girth

So to guess the weight of a live deer you look at the girth.

Depending on where you live the weights can vary slightly, but with practice and experience you can get better at guessing the girth of the deer and knowing the weight before killing it.

For white tailed deer, which are the most common type hunted, a deer with a girth of 24 inches will weight around 55 pounds.

The girth is the distance around the body of the deer at the widest spot.

For each added inch the weight of the deer goes up about five pounds or so. This holds true till you start getting into bigger deer. Then the weight goes up more rapidly.

For a deer that is 30 inches in girth it will weigh around 90 pounds.40 inch girth weight around 182 pounds and so on.

When estimating weight it is also important to consider if it is a doe or buck. Does will pretty much always weigh less than bucks. Also, back to location, northern animals tend to weigh more than southern animals, due to population purposes. When go deer hunting, the best shooting sticks for deer hunting is important, you should have one. 

Finding Weight After Field Dressing

First before figuring out the weight of the animal you have to field dress it. This is not a field dressing guide, so I won't go into detail on how to field dress the deer, but you have to make sure it is dead and then cut it open with a sharp knife.

Cut thru the fur layer, and then the muscle layer separately for best results. You then pull the layers back and pull out the organs. By removing the stomach, intestines, and other organs now, it will make it easier to take back with you and keep the meat fresher, as those parts break down first.

Once you have field dress the deer, removed all the insides, it is time to wrap it up tightly to make sure no contaminants get into the meat as you are taking the deer out of the woods. At this point you can still not guess the weight yet though to get an accurate idea of the yield of the deer.

Their are still a lot of inedible parts such as the bones, head, tail, etc.. that are left attached, but you can start to get a better idea of the final weight of the deer and how much meat it will yield. Field dressing the deer usually causes it to lose about 20lbs from the previous estimate based on girth.


A typical northern doe will weigh around 105 to 120 pounds after field dressing where a southern doe fawn will weigh closer to 45 to 65 pounds after field dressing. Yearling bucks weigh 105 to 125 pounds field dressed, and other bucks weigh more. These are all estimates though and every animal and location is different.

How Much is Lost in Butchering

So how much meat is actually on the animal? How much of the weight is edible?

Well, if you have a butcher that is skilled and minimizes lose, then you can get around 75% of the post field dressed weight as meat. On average the weight is broken down to 71-78% meat, where the difference is 6-9% hide, 11-14% as bone, and 5-6% as blood. This does not factor in damage to meat though from a bullet.

The cuts of the meat are roast from the front end, and butt. Steaks from the middle and bottom of back. Ribs from the rib area and chops from area above that, and flanks from the belly/middle section. With this you can look at the structure of the deer and see how much of each type of cut you will get.

Conclusion

So now you know that the amount of meat you get all depends on the size of the deer after it is field dressed, and completely boned and the hide is removed and blood is drained.

You know that you can use the girth of the chest of the deer to determine a good weight estimate, but that location of the deer depends a lot on how much it weights.

A good formula to use to figure out how much meat you will get is to go by carcass weight which is field dressed weight divided by 1.331.

Then take that number and multiple it by .67 to find the boneless weight, and lastly take the boneless weight and multiple it by .7 to get a realistic idea of the weight of the meat you will get, so using this say the field dressed weight is 100 pounds. Dividing that by 1.331 gets 75pounds.

Then multiplying that by .67 gets 50 pounds for the boneless weight and then lastly multiply by .7 gets 35 pounds for the realistic meat yield. That means a hundred pound field dressed deer gets 35 pounds of meat.

Using this formula and practice, you will be able to figure out how much meat you will get before you even kill the deer.

Which is Better Between a Vortex Strike Eagle vs Viper PST?

In this article, we will compare two rifle scopes made by Vortex. Those are Vortex Viper 1-4x24 vs Vortex Strike Eagle 1-6x24 AR BDC Reticle.

These rifles will be compared in terms of accuracy, durability, capabilities, and price. Finally, we will make some recommendations about when to use each scope.

Vortex Viper 1-4x24 Review

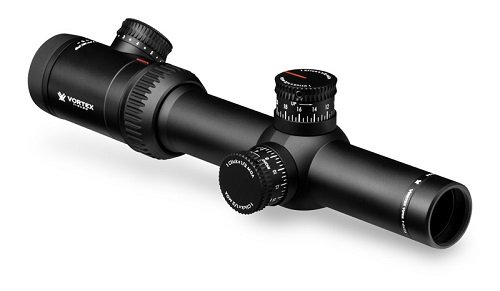
Vortex Viper PST 1-4x24 Riflescope with TMCQ MOA PST-14ST-A

Vortex Viper PST 1-4x24 Riflescope with TMCQ MOA PST-14ST-A Review

The Vortex Viper Precision Shooting Tactical (PST) is a variable zoom rifle scope with some excellent features. It is made of high quality materials, is very durable, and is an accurate scope. It has a 30mm tube, measures 9.7 inches long, and weighs 14.4 ounces. At 100 yards, the field of view is 98-27.5 feet, and each turret adjustment results in a ½ MOA change. The eye relief is 4 inches.

The pros of this scope are the accuracy, durability, and ease of use.

In terms of accuracy, this scope is very accurate for a few reasons.

First, the optics are multicoated, and the tube is 30mm in diameter. This allows for increased light transmission, which makes it easier to see down the scope.

The reticle is illuminated, etched in glass, and is on the second focal pane. This makes it always easy to see, and keeps the scale the same.

Pair these features with the small adjustment, and this makes for a very accurate scope.

The scope is also waterproof, fogproof, and shockproof. It has an ArmorTrek exterior finishing. All in all, this is a very durable and reliable rifle scope.

Another great feature of the scope is how easy it is to use. The capped turrets have a reset, so it is easy to zero after sighting in the scope. The internals of the turrets are extremely precise, which makes for reliable sight adjustments. The turrets and magnification setting also have fiber optics, to make it easier to see where it is set.

The reticle is what Vortex calls a Tactical Milling Close Quarter (TMCQ) reticle. It has some hashmarks for ranging, but isn’t as easy to use at range as some of the other reticles we have seen. The primary aiming point is relatively easy to pick up, but not as fast as some others.

Vortex Strike Eagle 1-6x24 Review

Vortex Optics Strike Eagle 1-6 x 24 AR-BDC Reticle

Vortex Optics Strike Eagle 1-6 x 24 AR-BDC Reticle Review

The Strike Eagle from Vortex is similar to the Viper PST. It is also a variable zoom rifle scope with a 30mm tube, but offers more magnification. The scope measures 10.5 inches, weighs 17.6 ounces, and has a 3.5 inch eye relief. At 100 yards, the field of view is 116-19.2 feet.

This scope has almost the exact same features as the Viper PST. It has fully multicoated optics and a wide tube. The turret adjustments are still ½ MOA increments. The reticle is also illuminated and glass-etched on the second focal pane. It is just as accurate as the Viper PST.

The durability is nearly the same as the Viper PST. It is waterproof, fogproof, shockproof, and has a hard finish on its exterior.

Similarly, the turrets have a reset, just like on the Viper PST. However, the turrent adjustment mechanics aren’t as precise, although we didn’t experience any issues.

What is different between Strike Eagle and the Viper PST

The primary differences between the Strike Eagle and the Viper PST is that the Strike Eagle can zoom further, offers a wider field of view, has a shorter eye relief, and has a slightly better reticle in our opinion. 

The shorter eye relief gives you the wider field of view, but will make it slightly more difficult to reacquire targets, depending on how much recoil your rifle has.

The reticle has wider posts, which make for easier target acquisition. The reticle is also a bullet drop compensator (BDC) style reticle, which makes it easier to shoot at longer ranges, if you know what you are doing.

So:

Vortex Viper PST 1-4x24 Riflescope with TMCQ MOA PST-14ST-A:-->  Check Price

Vortex Optics Strike Eagle 1-6 x 24 AR-BDC Reticle: Check Price

Recommendations

While both scopes are excellent choices, we have some basic recommendations for when we would use either scope. All 2 product is the best AR-15 scope, you should choose one. 

The Viper PST would be much better for close range uses. By that, we mean potential tactical and home defense shooting. However, as you increase in range, the Strike Eagle becomes a better choice.

While both scopes have ranging reticles, we found that the BDC reticle of the Strike Eagle was easier to use. Pair this with the greater magnification range and wider field of view, we found the Strike Eagle to be much easier to use at long range.

If you are doing any type of hunting, both scopes are very high quality and durable, so either one would work well. It really comes down to what range you are expecting to shoot at.

What to Do When Your AR is Not Chambering the Next Round

So, your AR isn’t cycling properly. After you fire a round, the next round doesn’t enter the chamber. What could be causing this problem?

In this article, we will talk about some of the most common reasons that this may be happening, and give some recommendations in conjunction.

All of these are very simple fixes, but could save you an embarrassing trip to the gun store.

Before getting into some of these potential fixes, we are going to assume that you know how to use the weapon properly and have done the basic immediate fixes, such as tapping the forward assist.

Change the Ammunition

Are you using a different ammunition than you usually do for your AR-15? This could be the cause of the issue. For various reasons, some weapons don’t like some ammunition.

Whether it be the casing or the pressure generated by the propellant, your weapon may simply not like the ammunition you’re using. If you find that your weapon doesn’t cycle well using one ammunition, try using a different one.

This is one of the easiest fixes on the list.

Clean Your Weapon

How Often Should I Clean My Gun

How Often Should I Clean My Gun

Another very simple fix is cleaning your weapon.

Carbon buildup can cause your weapon to not cycle well, and it is a very easy problem to fix. If you haven’t cleaned your weapon in a few range trips, try cleaning it out and see how it cycles after that. 

Try Different Magazines

Sometimes ammunition feeding issues can be caused by the magazine you are using.

Perhaps the lips of the magazine or the springs in the magazine are worn out.

Try it out with a different magazine, and see if that works better for you.

Check the Gas Tube

This isn’t necessarily a simple fix, but the issue could be caused by a leak in the gas blowback system.

Start where the gas tube meets the barrel, and work your way back, looking for leaks as you go.

Dependent on the exact issue, it may be a simple fix, or it may require a whole new gas system.

Buffer Spring Issues

An old buffer spring may cause the weapon to not chamber the next round properly. Similarly, a greased up buffer spring could also cause the same issue. Check out the buffer spring, and replace or clean it if need be.

Other Problems

If none of these issues are the one causing the malfunction, it may take a professional to diagnose it. There’s a chance that your bolt, bolt carrier group, or chamber are seriously damaged.

Basic reticle scope

Basic reticle scope

Conclusion

These are some of the basic issues that can cause your weapon to not chamber the next round properly of ar15 rifle.

While there are some simple fixes on this list, not everyone will be familiar with them. Unfortunately, it is not always this simple, and sometimes a professional will have to handle it for you.

5 Home Defense Tactics You Need To Know

Owning weapons is great. Owning weapons and knowing how to use them is even better.

Many people own weapons because they are afraid of their home being broken into. However, have you actually thought about what you’re going to do if that happens?

In this article, we will go over some basic home defense tactics. We will make some basic recommendations, but the best thing you can do is have some type of plan.

5 Home Defense Tactics to Learn

For this article, we will go over some general courses of action.

#1 Avoid

The first course of action is to completely avoid the intruder.

To many gun owners, this may seem strange, but your best bet is to avoid the intruder. Getting into a wild wild west shootout in your living room is not your best choice.

If the intruder does not know you are in the house, barricade yourself somewhere with a weapon, contact the police, and wait it out.

However, if you have children that are in separate bedrooms or the intruder knows that you are home, this may not be your best bet.

#2 Escape

If you and your family are able to easily run from the threat, that is another viable option. If everyone can safely and quietly get out, arm yourself, leave the home, and call the police.

However, with so many homes having bedrooms upstairs, this is likely not possible for you.

#3 Fight

So, if neither of these options work for you, you are going to have to engage the intruder. Before getting into some factors to consider, we are going to assume that your weapon is easily accessible, and preferably is stored with a round in the chamber.

Once you have armed yourself, they key things to consider are cover and speed.

#4 Cover

Cover refers to something that can protect you if you are getting shot at. True cover will stop a bullet. A wall is not cover, because a bullet can travel through a wall. As you can imagine, there are very few things within a home that truly are cover. A brick fireplace or extremely thick/heavy furniture may work.

So, with a lack of cover, there are a few things to think about for protecting yourself. If you can kneel down or engage the target from somewhere other than a normal standing profile, it will help you.

Kneeling makes your body smaller, so there is less to aim at. Shooting from a different perspective (such as from upstairs) will also help, because the intruder will have to make very fast adjustments to where they have to return fire... if they are able to.

While a wall is not cover, it will hide your body and give you a significant advantage. If you can peek out from around a wall, you will be able to get a shot off from an unusual position. The intruder will likely not be able to process getting shot at, your body being hidden behind a wall, and returning fire through a wall in rapid succession.

True cover is ideal. If you can shoot from somewhere that you can’t get shot through, you should do that. However, in a house, this is extremely unlikely.

#5 Speed

The last thing to consider about engaging an intruder is the speed at which you shoot.

Speed will save your life in this type of situation. You need to be able to rapidly engage a target that will likely be moving and potentially firing back.

When I say speed, I mean being able to rapidly acquire, engage, and re-engage the target.

Having a good sight will help, as it will help you acquire the target faster than iron sights. Familiarity with the weapon will allow you quickly turn the safety off and engage the target. Having a bright light mounted to your weapon will also help, as it may temporarily blind the target and give you a little extra time to acquire and engage.

This will come from practice. When you are at the range, practice acquiring and engaging targets faster. Doing nothing but accuracy shooting off of a shooting stand will not help you. Put yourself in some uncomfortable situations, from different positions, and acquire targets as fast as you can.

You can even do dry runs in your house. If you do this, make absolutely certain your weapon is cleared.

Other Considerations

Lastly, keep in mind where you will be shooting. Like we said before, bullets will travel through walls. Make sure you are aware of exactly where everyone in the house is before shooting at anything.

If you are shooting a shotgun with the best scope, most shot will be slowed down significantly, but slugs will definitely travel through walls. 


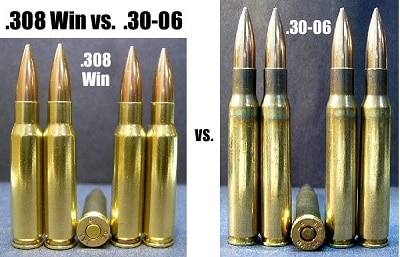
Which Is Better Between .308 Winchester vs .30-06 Springfield?

Both .308 Winchester and .30-06 Springfield are extremely popular rifle cartridges, specifically for big game hunting. Are you looking for some of the differences between the two?

We will help you make a decision today by comparing the two cartridges in terms of size, ballistics, and performance.

History of 2 Cartridges

Before getting into the specifics, we will give a very brief history of both rounds.

.308 Winchester: .308 was developed over 50 years ago, but despite its age, it is a very popular hunting round. It has retained its popularity for hunting due to its deadliness. In fact, it is the most widely used big game hunting cartridge in the world.

The cartridge is the starting point from which 7.62x51mm NATO was created, which is still widely used in the United States military today. On top of that, .308 is used by US military and various police snipers.

.30-06: It is well over 100 years old. Similar to .308, this round is still very popular today. Also similar to .308, the round was originally used in the US military. As a matter of fact, .30-06 is a parent cartridge of .308 Winchester.

Size

.308 bullets are 7.8mm in diameter, or .308 inches. The case measures 2.015 inches, and the overall length is 2.8 inches.

.30-06 bullets are also .308 inches in diameter, but the case is much longer. The case of .30-06 cartridges is 2.49 inches long. Overall, the round measures 3.34 inches.

In terms of size, the primary difference is the case length. While the projectiles are somewhat similar, .308 cases are much shorter. .308 is a short action rifle cartridge, meaning that it is fired from a weapon with a smaller bolt. This cuts down on the weight of the rifle.

Ballistics

The projectiles of .308 cartridges commonly weigh between 150 and 170 grains. Some hunting ammunition has bullets that weigh 178 to 185 grains. These projectiles are fired with a muzzle velocity of between 2600 and 2800 feet per second. This equates to around 2700 foot pounds of torque.

What's best ammo for ruger 10/22?

.30-06 projectiles weigh between 150 and 180 grains, generally speaking. When fired, the muzzle velocity of these bullets are around 2700 to 2900 feet per second, which is around 2800 foot pounds of torque.

In terms of effective range, the rounds are very similar. Both cartridges can be expected to shoot around 700 yards, dependent on the exact weapon and cartridge chosen.

As you can see, the bullets are extremely similar in size and weight. However, the primary difference comes with the fact that .30-06 bullets are fired with a greater muzzle velocity and energy. This comes from the fact that the case is longer, so they are able to fit more propellant into the cartridge. For this reason, this cartridge is deadlier than .308.

What about Price of .308 Winchester and 30-06

The ammunition of both calibers is extremely commonly priced.

Much of the same ammunition is available for the two rounds, and the prices are generally close together. In making your decision, price will not be much of a factor.

Weapon

One difference worth mentioning is the available weapons in each caliber.

.308 weapons run the gamut. Since it is a short action cartridge, there are multiple options available. There are bolt action rifles and modernized tactical rifles, such as the AR-15, that are all available in .308. best ar15 scope is good option for .308 rifle. 

Due to its added length, .30-06 weapons are much more limited. There really aren’t many tactical weapons available. Most .30-06 weapons are either bolt action or lever action, although there are some exceptions. There are a couple semiautomatics and at least one pump action rifle.

.30-06 weapons will also be much heavier.

Recommendations

If you will be hunting from a stand or doing any other type of hunting that does not require much walking or movement, we recommend .30-06. The increased deadliness will be worthwhile.

If you are going to be doing mountain hunts or some stalking, we would recommend .308. There are lighter weapons available that you will be able to move around easier.

If you are looking to do precision shooting, we recommend .308. It is slightly more accurate.

Conclusion

Both rounds are an excellent choice for big game hunting. There are very slight differences between the two, but we hope that this guide has been helpful.

5 Common Reloading Mistakes and How to Avoid Them

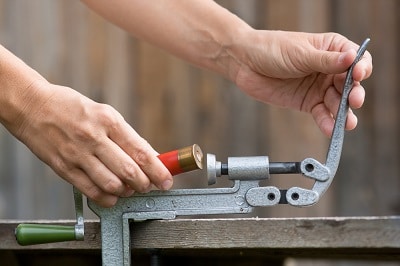
Handloading ammunition is a very common practice for intense shooters. Handloading allows you to save money while also customizing your ammunition to your exact kind of shooting. But are you making these common reloading mistakes?

There are several mistakes that come along with handloading your ammunition. Some of these mistakes can be very dangerous, despite the fact that they are usually easily avoidable.

Common Reloading Mistakes and How to Avoid Them

Look below to see some of the most common reloading mistakes, and get our recommendations for how to avoid it.

1. Powder Charge Errors

The first common mistake is loading the wrong powder or too much powder into the cartridge. This is first on our list due to how dangerous it can be.

If the wrong powder is loaded, or if one case is accidentally loaded with extra powder, there is a potential for serious damage and injury to occur.

To avoid this mistake, visually inspect each cartridge to make sure it has the same amount of powder as the rest. Another tip, if you are loading multiple types of cartridges, make sure to keep the powders separate and labeled correctly.

2. Bad Casing

The next common mistake is using a bad casing. Whether the casing is cracked, dented, or the incorrect size, using a bad casing is a bad idea.

If there is a crack in the casing, gases will be able to escape the cartridge, and could potentially harm the shooter. In the worst case scenario, the cartridge could actually split open completely and damage your weapon, if not worse.

To avoid this mistake, thoroughly inspect each casing before using them to handload ammunition.

3. Primer Seating

When seating the primer in the cartridge, there are two things that can go wrong.

If the primer isn’t seated deep enough, it will stick off the back end of the cartridge. Primers can be very sensitive, so if it sticks out too far, you risk the unlikely situation of a cartridge being ignited early. However, if the primer sticks out too far, it could also affect the cycling of the weapon.

If the primer is seated too deep, it could become even more sensitive, because some of it will be crushed as it is forced too deep into the casing. It also could cause issues with firing and cycling the weapon.

To avoid this mistake, inspect the cartridge after you put the primer in. It should sit below the surface of the back of the casing, but it shouldn’t be in too deep.

4. Projectile Seating

When you put the bullet in the cartridge, it is possible to either put it in too far or not far enough. If the projectile isn’t seated correctly, it could damage the action or the barrel of the weapon.

To avoid this, make sure you are guiding the projectile into place precisely and double checking after it is crimped.

5. Crimping Mistakes

Speaking of crimping, the last common mistake on our list is either crimping the casing too much or not enough.

If the case is crimped too much, it can cause issues cycling the weapon. It creates a bulge in the cartridge, which can cause it to hang up when trying to enter the chamber.

If the case isn’t crimped enough, the projectile could actually come out of the casing a little bit, which would also cause issues with loading and cycling the weapon.

To avoid this, make sure you develop a process for crimping and inspecting the ammunition after you have crimped it.

Should I Choose Buckshot vs. Birdshot for Home Defense

If you are a shotgun owner, then you have probably considered using it for home defense. With using a shotgun for home defense you may have asked yourself, or friends, what type of shell to use. The common answer has probably been either buckshot vs. birdshot. But, which is better? 

Most people when they say buckshot are referring to 00 which is nine .33 caliber balls in the shell. For birdshot, the common type to use is number 6 or 7.5. Well, this article is going to look at the advantages and disadvantages of each one and try to help you come to an answer of which one is best for home defense.

Pros And Cons of Buckshot and Birdshot

Buckshot Advantages

So buckshot is usually used for taking down larger animals, such as deer, which is where it gets its name. The rounds are bigger and do more damage. They also come out much faster and maintain their speed longer. Generally 00 buckshot comes out at 1250fps (feet per second).

This gives it plenty of penetration power and stopping power. Due to this extra power you don't have to be as close to your target to do the same amount of damage. 

Another advantage to buckshot is, since it is less rounds coming out of the shell, the spread of each ball is less. This means you are more likely to hit what you are aiming at. The closer you are to the target, the less spread their will be.

Also, for a home defense shotgun you can have a custom choke made. The choke helps narrow the barrel which keeps the spread down. This can be used for any type of round you are using.

So less spread and more power are the main advantages to using buckshot. 

Buckshot Disadvantages

The disadvantages to buckshot tie into the advantages. Since it comes out faster and has more penetrating power you can run into issues of over penetration. This is when the buckshot goes through the wall and into another room. This could put other bystanders in danger.

Your family that you are trying to protect might accidentally get hit with a stray round. Even worse is if the over penetration takes the round outside and you hit a neighbor.

Also, with the increased power comes more recoil. This means that if you need to fire multiple rounds it might be harder to re-aim or if you are a smaller person it might knock you back. If you get knocked back, then this could put you in harm's way and put you at a disadvantage against the intruder.

The recoil can be compensated for some with the type of shotgun you are using and the main issue with buckshot is the over penetration.

Advantages to Birdshot

So the advantages to birdshot are going to counter the disadvantages to buckshot. Birdshot pellets are much smaller and come out slower. They have decent force at closer ranges and can penetrate a person even through some clothing, but it will not go through walls. 

They still have the issue of going through windows, but since they slow down slower they will not hurt someone outside as bad as buckshot would.

Also, since it comes out slower, there is a lot less recoil. This means a smaller person can fire birdshot with much more accuracy, which is important because since the pellets are smaller, you need more of them to hit the target to have stopping power.

Birdshot can also be fired faster though because you are using less time to re-aim.

Disadvantages to Birdshot

The main disadvantage to birdshot is it might not have enough stopping power to stop the intruder. If the intruder is on drugs, drunk, or out of their mind in some way, then some small damage may not phase them. This means you either need to be closer when you shoot them with the birdshot to have more penetration or hit them with more.

Also, bird shot may have a hard time of getting through thick clothing. If the intruder has a heavy coat or leather coat on, then the birdshot may not make it deep enough to cause real damage to stop the intruder.

Choosing an ammo is important, so scope too, you need best shotgun scope for deer hunting , It is a non wasteful choice. 

Which should you choose between Buckshot vs Birdshot?

So, which one should you use for home defense now that you know the advantages and disadvantages. Well, if you are a smaller person and can't handle the recoil of buckshot, then you should use birdshot because you want to make sure you hit your target.

If you live in a really busy area, then you may also want to consider using birdshot.

In most situations, though, you should probably use buckshot as long as you can be sure to hit what you are aiming at. This is because the stopping power it provides is important. You want to make sure you are able to stop the target as quickly as possible if you are trying to protect yourself and family.

Also, over penetration shouldn't be much of an issue because the intruder is probably near the door and not between you and your family. Stray rounds should not be going into rooms where your family is and neighbors houses should be far enough away that rounds should not go in. Especially if the homes are brick it will keep the rounds from going to far.

There is a reason the police use 00 buckshot in their shotguns. It is because it works to stop the person needing stopped and the reward for using it out weights the risk of it being used.

The last thing you want is to shoot the intruder and not stop them so for home defense in most situations 00 buckshot is the way to go.


What Distance Should Be Used to Pattern a Shotgun?

This is a question that can be confusing to many people. However, it really is not that difficult if you understand what you are doing. In this article, we will teach you how to pattern a shotgun, and what distances should be used.

What Distance Should Be Used To Pattern A Shotgun

What Distance Should Be Used To Pattern A Shotgun

The Basics

If you are unfamiliar, patterning a shotgun refers to the shot pattern that is produced. Essentially, it boils down to taking some target practice with your shotgun to see what the pattern of shot looks like and adjusting it from there.

It is extremely important to pattern a shotgun to make sure that your weapon shoots accurately and is able to accomplish what you need it to.

Factors That Affect the Pattern

There are a few key factors that will affect the pattern that your shotgun produces. Therefore, these are the things that you should change if you want to change the pattern of the shotgun.

The first factor is the choke you are using. Just in case anyone doesn’t know, a choke does exactly what it sounds like. It “chokes” the muzzle of the shotgun to concentrate the shot. As you can imagine, changing your choke can either tighten or loosen your pattern.

A full choke will tighten the pattern the most, while an improved cylinder choke will be only slightly tighter than the normal bore. A modified choke is somewhere in the middle. There are many different kinds of chokes available. Do your research, and you will be able to find out the spread of each.

The next factor is the exact load that you are using. Each load will perform slightly differently. There really isn’t one specific answer – you are going to have to test it out on your own. But, that is the whole point of patterning your shotgun. Trying different things out until it is perfect for you.

What Distance?

This question is actually rather simple. You should pattern your shotgun at the range you will be shooting at. This will be dependent on what type of hunting you are doing, but that is the simplest answer. While it may not help much, it really is dependent on what distance you are planning on shooting at.

If you pattern your shotgun at 20 yards, but then try to shoot it at 40 yards, your pattern is going to be terrible. It’s not exactly exciting, but you should really pattern your shotgun for each type of shooting you do.

In doing so, you will pick out the best choke and load to use at your specific distance and for your specific hunting.

Conclusion

The pattern of a shotgun is pretty simple to understand. Patterning your shotgun for each type of hunting you plan to do will go a long way in ensuring that you are successful. To change the pattern, try out different chokes and different loads.

Visit Us On FacebookVisit Us On PinterestCheck Our Feed