Learn How to Reload Ammo, Quickly and Correctly

When someone asks if you know how to operate a gun, a quick and resounding “Yes!” is certain to burst from your lips. But do you quickly fall into a crisis of self-confidence afterwards? Maybe you don’t know how to reload ammo quickly.

It may be because you aren’t confident in your ability to correctly reload ammo. I first learned from my uncle, and not until my fourth or fifth trip to the range. Before that, I fumbled around like an amateur because I was afraid to ask how to reload ammo.

Well, today my friend, we’re going to talk about the proper steps to get er’ done.

How to reload ammo: The supplies

There aren’t many supplies, but each one of them is extremely important. Here they are:

  • Reloading press. This can be picked up from a gunsmith or sportsman store.
  • Lubricated casings (we’ll discuss this in the next section)
  • Be sure that you have the right-sized bullets to fit the casings you’ve amassed from trips to the range.
  • Gun powder relevant to the shell size. Here is a great video on the basics of how to reload ammo.

How to reload ammo: The basics and getting set up

Reloading ammo is a great way to save some money on your shooting excursions and keep those empty casings from going to waste.

If any of the casings have been stepped on, ran over, or are otherwise disfigured, you’re probably wasting time trying to reload them because the measurements will be off for the gunpowder and bullet placement. Better to just throw those to the wolves. Speaking of casings:

  • Clean the casings prior to reloading. Remove residue and powder with a light cloth. Then, spray some lubricant on the inside or rub some on the cloth and apply, so that the casing stays slick and ready.
  • Insert the cases into your loading press with the handle positioned up.
  • Lower the handle down, resizing the case and forcing the used primers out of position.
  • Do this over and over, for each case you’re planning to reload. Hint: When selecting a reloading press, get one that holds multiple cases at once. This will save you an immense amount of time and effort, as opposed to doing one at a time. Odds are, if you’re only doing one at a time, your newfound hobby of reloading ammo is going to become a chore really

The process of reloading ammo

Now you’re all set and ready to start reloading. Before you begin, double check that everything is in its place and looks ready. Are all of the casings clean and shiny? Loaded correctly? Let’s do this!

  • Start by lifting the handle on the press up to its highest position, and place a fresh primer into the cup of the primer arm.
  • With the same amount of finesse you employ on a deer hunt, push the primer arm into the ramming slot.
  • Bring the case down onto the primer.
  • Remove the casing, and then take a look at the primer. If it’s not flush (or close to it), then you’ve done something wrong. Re-evaluate your setup process for the rest of the casings if that happens.
https://www.youtube.com/watch?v=Mkz0pZO0bFQ

You have to have the best reloading scale to reloading ammo.

Reload powder into each casing.

This is the most important part, obviously. Make sure that you are using the right powder, otherwise this entire process is going to backfire on you and all of your time will be wasted. The correct weight and variety of powder is essential. Focus intently, and begin:

  • Using a volumetric powder measure, portion the correct amount of powder for each case. You can also use a calibrated dipper if you have to, but I prefer not to do it that way
  • With a funnel, carefully add the powder into the case. If there is any extra powder, immediately remove it from the area.
  • Seat the bullet to the correct depth within the neck of the case. The seating die will crimp the shell and ensure everything is in its proper place. This should be done by putting once casing in the shell holder and lowering the handle on the press. You’ll want to hold the bullet with your thumb and index finger for optimal grip – kind of like the first couple hammers onto a nail until it bites its way into the wood.
  • After the ammo has been reloaded, add a light coat of gun oil to your dies. Clean everything off well. I’ve always preferred to add some gun oil onto the reloading press as well, just to keep it moving nice and smoothly. It’s kind of like a van door, you’ve got to keep it lubed or else it starts to creak. After a while, this can have a negative effect on the reloading process.

That’s about it. After you’ve reloaded your casings, put them into ammo cases and they’re good to go for your next trip to the range!

If you’re using shotgun shells, check the empties for reusable hulls prior to reloading – this can save you some extra time and money. Also, you’ll be using different supplies such as a shell plate, which is used to hold the shell while you add primer and gun powder. As always, be very careful when operating gun materials, as they can be very dangerous.

Conclusion

That about sums it up. I tend to reload ammo a couple of days before heading to the range, that way if there are any problems or I don’t have enough I’ve got plenty of time to hit the shop. If anything doesn’t seem right during the reloading process, discard that casing. Always better to be safe than sorry when it comes to guns. . Have any tricks of the trade you’d like to add?

Leave a comment here and we’ll shoot back and forth. If you found this guide helpful, please share on your social channels – knowledge is power!

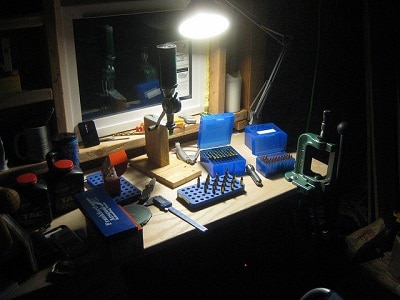
Featured Image by Ryo Chijiiwa

How to Find a Coyote Den?

Do you know how to find a coyote den? The toughest thing about finding a coyote den is the pure intelligence of the animal.

Coyotes have great instincts and are quick to adapt to different situations – natural and predatory. Coyotes should be monitored if you have livestock or significant agriculture, and there are multiple steps on how to find a coyote den that we will discuss here.

Research a coyote den’s characteristics.

First and foremost, note that coyotes do not use dens year round. They primarily use them for pupping, or when elements drive them inside. Typically, coyote dens are located on hillisides and deep creek beds that allow for easy digging and earthmoving. Loose shrubbery and branches also come in handy, giving the coyotes a bit of extra security. Here is a great video about coyote dens:

  • Pups move out at a young age, but remain active in any hiding spots around the den. Coyotes frequently sleep outside, and despite being near den, aren’t necessarily going to be in it. Keep this in mind when approaching.
  • Dens are typically located below ground level, sometimes up to five or six feet down. There will be a dug-out tunnel that leads to a main living area that is expanded and can fit multiple coyotes.
  • Coyotes typically rotate between multiple dens. They will be spread out around an area, and the animals are very careful not to lead others back to their den. This is what makes it so challenging when learning how to find a coyote den. Here is a great article explaining the basics behind coyote denning.
  • Identify water sources nearby where you suspect a den may be. The coyotes need to drink water, so if you can confirm they are drinking from a certain source than you are on the right track.

Identify where you’ve seen or heard the coyotes.

Likely, you’ll hear them howling at night, or in the early evening. On the edges of nature preserves, parks, green spaces, and hillsides, coyotes actually tend to make their presence quite known- it’s the exact location that is much harder to pinpoint. Then comes the process of finding a coyote den. Plan to devote several days to the process, if you’re really serious about finding it.

You may find scat or other remnants of their presence in areas near your home. Try walking about fifty feet further out and seeing if you find more, if so, you have identified which direction they are coming from. Here are some tips to help everything go smoothly:

  • Coyotes typically prowl about five or six square miles from their den, in any given direction. The further they roam from the den, the more on edge they will be. This means they will be more easily startled and quicker to retreat.
  • They are quick and often deceiving because you’ll hear them in one place one moment, and in another the next. Try to track where you most frequently see or hear the coyotes. Even if that’s not their den, you’ll have a general idea of their path and where they spend the most time.
  • If you aren’t having any luck, try howling and seeing if you can generate a response from the coyotes. Try different pitches, tones, and cackles that resemble those made by the animal

Where could other prey be located near your property? Maybe their coming around has nothing to do with you or your property. If there are collections of prey, bodies of water, or other attractive elements nearby, try tracking them from that spot back to the den. For basic tracking techniques, check out this video.

https://www.youtube.com/watch?v=ZpWmfw3lmS0

Track the coyote back to its den.

If the coyote has attacked any of your livestock, you’re likely very upset and wanting to get the pesky coyotes as far away from your animals as possible (if not take it a step further!). Be careful when searching around at night, and definitely DO NOT BRING YOUR DOG WITH YOU. Coyote hunting is an exciting activity, but one best done alone.

The animals spook easy and even if you do locate a den, the odds that they will return there are very minimal if they know that you have found it. All things considered, you shouldn’t have too much of a problem tracing the suspect back to its den from the site of the kill. Here’s what to do:

  • Look for blood stains, trampled shrubbery or plants nearby the kill site. Figure out the most likely direction of escape and trace the potential route with your eyes back to a nearby hillside or embankment.
  • https://www.youtube.com/watch?v=04cmkr6da6c
  • Identify a game trail or other foot markings left by the coyote leading up to the hillside or embankment. If you can’t find any obvious trails, look for markings left on nearby trees or other larger vegetation.
  • Follow that path as closely as you can. Remember, it may be up to six miles, so having a four-wheeler or motorbike may come in handy. Although you’ll want to be as quiet as possible during the final or actual approach.
  • When close, let out a coyote howl and see if a response happens. If you get one, don’t be surprised if you do not receive another for quite some time. Be ready to track based on the one howl that you got from the coyote.
  • Always be careful! Shoo them away but don’t put yourself in danger.

Conclusion

Locating a coyote den is often a lengthy process. Personally, I enjoy it because it’s a good excuse to get out into nature and focus on something direct and real.

Remember to track the coyotes via sounds, tracks, and any sightings you encounter, for several days before attempting to locate their den.

I always suggest perusing around your property regularly just to keep aware of any new ‘neighbors’ and to establish a firm presence and authority.

If you found this article helpful, please share on social media, and don’t forget to leave any comments here. Let;’s get a discussion going!

Featured Image by wplynn

What Are the Best Scopes for an AR-10 Rifle?

What are the best scopes for an AR-10 rifle? There are so many options these days, and certainly the discussions have flown back and forth as to who does it best.

Personally, my uncle got me into Nikon scopes as a kid and I’ve always preferred them, but over the last five years I’ve come across a few others that I think are worth mentioning.

Through demoing numerous scopes at ranges, talking extensively with hunters, and incorporating my personal situation and preferences, I’ve compiled here the four best scopes for an AR-10.

All of these are worth considering, and I think that through applying your personal preferences you’ll find one here that meets your needs.

Top Our Pick For Best Scopes For Ar 10 In 2018

Top 4 Best Scopes For AR 10 On The Market


PRODUCT PRODUCT TITLE    
DS2-table-__image

Vortex Optics Diamondback 4-12x40 Dead-Hold BDC Reticle - 1 Inch Tube (DBK-04-BDC)

  • Waterproof
  • Fogproof
  • Offers the ability to zero reset after sight-in
CHECK ON AMAZON
DS2-table-__image

UTG 3-12X44 30mm Compact Scope, AO, 36-color Mil-dot, Rings

  • Premium lockable and resettable turrets
  • Extremely simple and straight forward
  • Good for zeroing on 50 yards
CHECK ON AMAZON
DS2-table-__image

Nikon M-308 4-16x42mm Riflescope w/ BDC 800 Reticle,Black

  • Clear optics and strong BDC reticle
  • Great appearance in the water
  • Very durable
CHECK ON AMAZON
DS2-table-__image

Primary Arms 4-14 X 44 FFP Scope ACSS HUD .308 BDC Reticle PA4-14XFFP308

  • Improve accuracy at the range and in the field
  • Minimize need for add-ons
  • Fit a variety of guns
CHECK ON AMAZON

This is my review about 4 scope for ar 10 on the market, it will help you find the best for hunting. Check it out:

1.UTG 3-12X44 30mm Compact Scope, AO, 36-color Mil-dot, Rings

UTG 3-12X44 30mm Compact Scope, AO, 36-color Mil-dot, Rings

UTG 3-12X44 30mm Compact Scope, AO, 36-color Mil-dot, Rings

When looking for the best scope for an AR-10, there is really only one viable option: the UTG 3-12X44 30mm Compact Scope. This scope, renowned for its accuracy and dependability in tough field situations, has risen as the cream of the crop for three main reasons:

  • The zeroing capability: Not only is this scope extremely simple and straight forward when zeroing, it holds the zero better than any scope on the market. Add to this that it also is a great package value without the necessity to purchase a bunch of expensive add-ons in order to optimize, and you’ve got yourself a winner here. Even after removing the scope and then reattaching it, your aim will remain perfect. It makes a good shooter feel like a great shooter!
  • It’s durability: Instead of obtaining a cheaply made scope and having to replace it every year or two (for avid users), this UTG scope will last a lifetime is properly cared for. The 3X zoom is good for zeroing on 50 yards and nailing the preferred part of the target from 100 yards no problem
  • Performance: Take it out as far as 900 yards and back to zero without losing focus or confidence in what you are doing. The scope is easily mountable, easily adjustable, and easy to master even for new shooters

Overall, this UTG scope is the best scope for an AR-10 that you’ll find anywhere on the market. I’ve been using it for years without ever having to have maintenance done or want to switch it up. Honestly, I never even want to try another scope, period. This is the top of the line

2. Vortex Optics Diamondback 4-12x40 Dead-Hold BDC Reticle - 1 Inch Tube (DBK-04-BDC)

Vortex Optics Diamondback 4-12x40 Dead-Hold BDC Reticle - 1 Inch Tube (DBK-04-BDC)
Vortex Optics Diamondback 4-12×40 Dead-Hold BDC Reticle – 1 Inch Tube (DBK-04-BDC)

Vortex rockets itself onto the list of best scopes for an AR-10 with this Diamondback model.

These things are sleek and effective- I first bought one years ago and have since bought this model and love the optics (I am entering my fifties now).

The glass is perfectly viewable and takes little to no time to adjust to. The reticle is spot on and extremely life-like.

Here are the best features:

  • The visibility and range of this scope are second to none
  • Numerous rounds don’t offset the visibility or accuracy, unless you’re clunking the thing around a bunch. I’ve held zero for over 300 rounds and have friends who have done the same.
  • I find the crosshair extremely helpful
  • Tuning the sight to your liking takes just a few seconds

And what I don’t like:

  • I'm so used to using Nikon and Leupold that it did take a moment to familiarize myself with set-up. That is the main disadvantage of Vortex, is that they aren’t as widely used and thus there aren’t as many of them out at the range if I feel like asking for advice.

3. Nikon M-308 4-16x42mm Riflescope w/ BDC 800 Reticle,Black

Nikon M-308 4-16x42mm Riflescope w/ BDC 800 Reticle,Black

Nikon M-308 4-16x42mm Riflescope w/ BDC 800 Reticle,Black

The Nikon M-308 is one of the best scopes for an AR 10 because of the quick-focus eyepiece.

Nikon definitely responded to feedback on eyepieces and went the extra mile with this one. The piece is rather versatile, functioning without dependence on barrel length and works on any .308 platform.

I really loved the image quality, especially considering the price point and size of this scope. It’s lightweight, easy to mount, and retains accuracy through several rounds of shooting.

  • Clear optics and strong BDC reticle
  • Great appearance in the water, enough to fool the uncanny hunter who hasn’t seen them before.
  • Bore sighted and great sight picture, up to 1000 yards. Have we mentioned how great the visibility is?
  • It’s very durable and will last many years. Nikon is putting out excellent scopes that are affordable and useful for hunters of all abilities

The down side:

  • Be sure to inquire as to whether your order includes the M308 mount. Some sellers include this in the purchase, others force you to buy it separately. It’s a much better deal when the mount is included.

4. Primary Arms 4-14 X 44 FFP Scope ACSS HUD .308 BDC Reticle PA4-14XFFP308

Primary Arms 4-14 X 44 FFP Scope ACSS HUD .308 BDC Reticle PA4-14XFFP308

Primary Arms 4-14 X 44 FFP Scope ACSS HUD .308 BDC Reticle PA4-14XFFP308

You are out the shooting and the reticle on your scope is fogged or otherwise detracting from optimal vision. Thinking you’ve got the target in range and zeroed, you fire anyway. But the shot misses, too high. Over and again, this keeps happening. Enter the Primary Arms 4-14 X 44 FFP Scope. After a quick installation, you’re back out there. Primary Arms solves the problems of tough zeroes and clouded view in the field.

Better accuracy through simple physics

The ACSS reticle is top notch, greatly benefitting the functionality of the scope. When shooting from 500-600 yards, closing the gap on those high shots and missing left or right is a breeze. You’d be hard-pressed to find another rifle scope that so easily eliminates that problem.

When shooting with an AR-10, or even those with Ruger or Remington models, this Primary Arms scope easily works with the measurements of the gun to hold zero and improve shot accuracy, even on moving targets.

Personal preference with the Primary Arms scope

Some shooters prefer minimum zoom with this scope, hoping only for slight adjustments to their original line of sight. But by sliding the zoom up a bit, it is incredibly easy to see a dramatic increase in target acquisition from 500+ yards.

These days, with shooters adding more gadgets to their setup, this scope cuts back on what owners need to carry into the field. If you find the weight of your gear is getting out of hand with stuff meant to improve accuracy, cut it all back and get this scope.

Putting the Primary Arms Rifle Scope to the test

Depending on what setup you’re using currently, this scope will help in these ways:

  • Improve accuracy at the range and in the field
  • Minimize need for add-ons
  • Fit a variety of guns, specifically great for an AR-10

When needing a quick fix that won’t break the bank, this is the scope for you. It is among the best scopes for an AR-10.

Conclusion

These days, there are so many scopes on the market that choosing the best one can be challenge. I highly recommend going with the Nikon M-308 4-16x42mm Riflescope w/ BDC 800 Reticle,Black. There simply aren’t any drawbacks to this scope, from the time you open the box up through the 500th round you’ll fire.

It is the highest quality scope on the list here and by far the most effective anywhere near its price range.

I recommend you should read my post about best ar scope mount, it will give you a good mount for your ar 10 scope. 

I’m interested to hear which best scope for ar 10 you end up going with – let’s get a discussion going in the comments here and if you enjoyed this article, please share on social media!

3 Best Duck Decoys on the Market

The best duck decoys will work in your favor with minimal effort, instilling confidence in the ducks that the area you are trying to lure them to is a safe, habitable, and enjoyable environment for them.

Decoys are also meant to reduce the hunter’s need to overcall in order to lure ducks by giving the feel of a natural environment.

When implementing duck decoys into your hunting strategy, plan to assemble a collection of them – potentially up to a dozen or more, and practice setting them up in a realistic fashion.

The more natural your decoy setup, the better it will work, leading to more fowl.

Guy Huntley

Here, we’ll look at three of the best duck decoys on the market.

Top Our Pick For Best Duck Decoys On The Market

Top 3 Best Duck Decoys On The Market

This is my review about 3 duck decoys in the market, it will help you find the best for hunting. Check out it:

1. Greenhead Gear Pro-Grade Duck Decoy, Mallards/Butt-Up Feeder Pack, Pair

Greenhead Gear Pro-Grade Duck Decoy,Mallards/Butt-Up Feeder Pack,Pair

This is one of the most effective duck decoys on the market because it simulates the ducks in feeding position.

This makes it harder to detect as phony and gives the impression of the area being a suitable feeding environment.

Ducks traverse environments seeking safe and popular feeding grounds, and by portraying that image you will greatly increase your odds of bringing them in.

Some great insight on Greenhead decoys can be found here:

  • Minimal movement reduces your chances of losing them out in the water, especially if you rig up a jerk string.
  • Realistically colored and designed, and built to last for a long time.

  • Great appearance in the water, enough to fool the uncanny hunter who hasn’t seen them before

But there are a couple down points:

  • I’ve heard about leakage issues. While this is likely a rare defect or result of misuse, be careful to follow installation instructions.

  • Butt-up feeders don’t resemble the full duck and must be used alongside other types of decoys.

Overall, these are a great addition to your decoy collection and help complete a well-rounded decoy scene.

2. Mojo Outdoors Teal Duck Decoy

Mojo Outdoors Teal Duck Decoy

The Mojo Outdoors decoy is a master of its intended purpose: luring in fast-moving fowl.

This is the best spinning wing duck decoy on the market. The wings spin incredibly fast and will catch the attention of nearly any ducks moving through your hunting area.

Mallards, teal, gadwall, pintails, and other ducks are attracted to the ‘strobe effect’ created by the wings and are likely to have the interest piqued enough to check out the situation. Here are the best things about this duck decoy:

  • Single speed and simple operation are If you encounter and issues, replacement wings are readily available online and at outdoors retailers.

  • Despite the three-piece support pole, this duck decoy is surprisingly light weight. For me, that was a big selling point because I already have a large collection and didn’t want to add much weight to it, but it compacts well for transport and storage and makes it one of the best duck decoys
  • Batteries last for several hours, so there is no need to replace them in the middle of a day hunt. They claim 16 hours, and I have no reason to argue with that.

There are a couple of improvements that could be made for future models, such:

  • Making the wings easier to screw off. After a long day in the blind, the last thing I want to deal with is prepping for storage, and this decoy can take a few minutes.

  • The wings are built with thumb screws instead of magnets. While this makes it more durable, it also (at least to me) appears to make it slightly less realistic and modern.

3. MOJO Outdoors Baby Mojo Mallard Duck Decoy

MOJO Outdoors Baby Mojo Mallard Duck Decoy

Mojo has another strong offering here with the Mallard Decoy.

This is another great addition to your arsenal of action-depicting decoys because it gives the appearance of a curious duck coming in to peruse a new feeding ground or piece of terrain.

When spread, this decoy is about 20 inches wide, starkly resembling a green head. Because it looks as though it is landing on water, if you set it up to your left, other birds will want to land in front of it and thus will be coming down right in front of you.

Here are the things I like best about this decoy:

  • Batteries last for several hours, so there is no need to replace them in the middle of a day hunt. They claim 16 hours, and I have no reason to argue with that.

  • The battery can be charged in your truck with disassembling the product.

  • The wings on this baby are a magnet, so no screwing and unscrewing are

  • The legs can be taken off, a feature unique to decoys like this. I personally like to keep them on, but depending on the location of your setup it may suit you better to remove them

On the downside:

  • Magnets can come unattached, especially during high wind. Be sure you have aligned the wings correctly onto the magnetic part to minimize the chance of this happening

  • Don’t use it in salt water as it will rust the product after time. Just something to be aware of if you plan to be a long-term duck hunter.

Head To Head Comparison Of 3 Best Duck Decoys

My favorite product here is the MOJO Outdoors Baby Mojo. I’ve never had a decoy so effective at drawing in birds to land right in front of it. While all three of these are different and are a great addition to your hunting setup, this one is the best buy. I recommend having a couple of them set up with one closer to you and the other further away. Throw a couple of Greenhead Pro-Grades in the water along with some generic duck decoys on top of the water, and you’ll have a great setup. Here is my guide about how to set up duck decoys, read carefully before you do it.

Conclusion

Using the best duck decoys has greatly improved my hunts. I’m able to lure in more birds and be more specific about where they are coming down (hopefully right in my line of sight!) and the results have been incredible. If you found this article helpful, please share on social media, and let’s get a conversation going in the comments.

How to Set Up Duck Decoys for More Effective Hunting

Now that you have put together a collection of duck decoys, the obvious question comes up: How to set up duck decoys and decoy spreads.

This is where the artist in you gets to come out, as you develop a strategy to create a spread that optimizes both the surroundings and your collection.

Here in this article, we will look at the basics for how to set up your decoy spread, what to look out for, and I’ll re-emphasize the importance of patience.

How to Set Up Duck Decoys the Best Way

These are the basic introductory steps:

1. Identify your surroundings.

If you’re hunting in a swamp or shallow water basin, keep everything as versatile and mobile as you can. Don’t make it hard to break down and pack out. Keep your ducks clean and shiny to maximize realism. If you are setting up a permanent spread, try to create a scene. Place your decoys where you have seen ducks congregating in the past, and don’t just focus on one area. Get the whole spread as thorough as you can using a couple of hundred decoys, if possible.

2. For non-permanent spreads, use light-weight anchors.

In swamps and shallow backwater, you won’t need more than 6oz anchors. Or, use over-the-head anchors or neck ring anchors. For larger bodies of water, upsize to 12-16oz neck rings or over-the-heads.

3. Make your mallards a prominent attention-grabber.

Mallards are the universal duck, found in many locations and known to socialize with other species. Thus, having your mallard decoys spread around isn’t going to intimidate approaching ducks (in fact, it should help draw them in). When planning how to set up a duck decoy spread, start here.

4. Then, place pintails and black ducks.

The white tails and all-black bodies add another touch of realism to your display. Place them in highly visible areas, preferably around the perimeter of the spread with one or two in the center. These are the two primary decoys you should employ in addition to the mallards. Unless you already own other decoy species, don’t worry about obtaining them because you’ll get the added attention-grabbing out of pintails and black ducks.

5. For permanent spreads with high visibility, use standard size decoys.

They are easier to pack in and set up. Because the ducks will see the spread as they approach, there is no need to use larger decoys. Save these for low-visibility spreads. While you’ll want to have some ducks in clusters, be sure to spread ducks out throughout the available area so that approaching fowl will be enticed no matter the direction, height, or angle they are approaching from.

6. Use the most attractive decoys to lead into the preferred landing zone.

This should be set up so that you’ll have maximum visibility from the blind or shooting spot without having to move and potentially scare the ducks.

7. Put a line of ducks on a log.

Then, float the branch out into the water (with a jerk string to pull it back in). Ducks love to lounge on floating logs, and a bit of an active touch like this can really increase the attractiveness of your spread. Leave space on either end of the setup for incoming ducks to land – try to leave enough room for a few ducks, so that the approaching fowl has plenty of space without overcrowding.

8. Use wing-spinners and butt-up feeders.

These help your spread touch on as many triggers of a duck’s senses as possible. Feeding, flying, resting, and calling (of course you still need to be a good caller!) will help make your spread irresistible.

Additional Thoughts About  How To Set Up Duck Decoys

californiadfg

Remember, always keep a positive attitude! No matter how good your spread is, some days the ducks just aren’t going to bite. The important thing is not to let this get you down, or to think you aren’t good enough to attract them. Even the best big league hitters have a slump now and then, and it isn’t because they aren’t working hard.

Part of hunting is luck and the mood of the fowl. If you catch them on the right day, your learning how to set up a duck decoy spread will be the icing on the cake luring them into your arms.

After setting up your spread, hunker down and wait. Be patient, bring beer and lunch, and accept the fact that you’re working on their schedule, not yours. Be prepared for periods of overwhelming activity as well as periods of mind-numbing boredom (that’s what the beer is for!).

Conclusion

Setting up a duck decoy spread is a fun and worthwhile activity, and if it’s your first one you still have the benefit of feeling it out and seeing what works for your setup. Remember- don’t get discouraged. Do some rearranging and try slight alterations. If you enjoyed this article, please share on social media and feel free to comment! Let’s get a conversation going.

5 Duck Hunting Dog Breeds You Need to Know

Dogs are man’s best friend, and one of the biggest reasons for that is how helpful they can be during a hunt. Personally, I have a beagle that’s been with me for four years now. There are several options to choose from, much of which is decided by individual preference. Waterfowl hunters, inland bird hunters, and more generic game hunters can all help step your hunting game up significantly. Here are the top five duck hunting breeds to have by your side in the blind.

5 Duck Hunting Dog Breeds You Need To Know

1. Brittany

Craige Moore

If you hunt upland, a Brittany Springer is the best hunting breed you can have. Not only are they great swimmers and incredibly loyal, the icing on the cake is that they are also great listeners.

They are big enough that retrieving a larger duck is no problem, and agile enough that they move around an area quickly and discreetly.

Training a springer is as simple as bringing them on a few hunts and thoroughly walking them through the routine of what they need to do. This breed is particularly strong when compared to others that aren’t as agile in and around water.

2. Retrievers

Tony Mullen

Let’s start with Golden Retrievers. This breed is masterful at both force and blind retrieving, and is smart enough to perform well under pressure (in a competition, or in time-sensitive or crowd-sensitive areas). Golden retrievers are impeccable swimmers, runners, and might be the most loyal dog you’ll ever encounter. If I didn’t have my beagle, I’d have one of these. Other retrievers, such as Chesapeake Bay Retrievers, are honorary mentions here. Here is a video that goes into detail on this:

https://www.youtube.com/watch?v=cxPyMMPoe3g

Next, let’s talk about Labrador retrievers. The distant cousin of golden retrievers, these dogs are also incredibly versatile in the field. It often seems like they prefer water over land, which is perfect for duck hunting. It’s important to begin training retrievers early in life, because they have immense amounts of energy and need the discipline to be engrained from a young age in order to be effective. But once they’re trained, you won’t find a better hunting dog than a retriever. Here are more top retrievers to consider.

3. Beagle

Tony Mullen

Now, I don’t want to sound biased here, but Beagles have a connection with humans that is incomparable. Their scent-tracking abilities on the hunt are second to none. They are so fast and can dart around through bushes and shrubbery in a way that larger dogs can’t. I’ve never seen a duck retrieved so fast as what a Beagle will do every time. I also advise starting training when the Beagle is young. The earlier that they get the scents down, and are used to retrieving ducks, the better they will be as adult hunting dogs.

4. Cocker Spaniel

Aero Pixels

Here is one of the best duck hunting dog breeds, simply because they were bred to hunt from the beginning. With quick movements and a keen eye (and nose!) for fallen fowl, it’s no wonder Cocker Spaniels are such commonplace in hunting fields across the world. These dogs necessitate less training than other breeds that have a more difficult time paying attention. A few runs through of the routine, and Cocker Spaniels will be begging you to take them out hunting nearly day. It is more effective when using with best duck call for beginners.

5. Poodle

Koji Ishii

Far beyond the showrooms of dog competitions are the poodles actually doing what they are best at.

These dogs are fiercely loyal, incredibly smart, and not afraid of anything.

Send your poodle into the water, across a field, through a bush- as long as it will feel valued and rewarded upon returning with the bird, the dog will outperform any other. Just remember, toy poodles and other smaller breeds aren’t going to cut it. You must have a full-size poodle and be willing to put in the training time to get it up to speed. Because they are so smart, poodles are more alert than most other top duck hunting dog breeds and therefore will pick up on smells and abstract hints that the others would miss.

Don’t believe me? Watch this video:

Conclusion

While there are a number of great breeds, these are the top 5 duck hunting dog breeds you can have in terms of training, memory, agility, and overall enthusiasm for hunting.

Do you use a breed that I didn’t discuss here? Share a photo and a story here in the comments and let’s get a discussion going.

I hope you found this article helpful, if so please share on social media. Hunting is such a powerful activity, and having a great dog along not only makes it more fun and efficient, it helps with conservation and with promoting the sport as a great way to bond with your best friend.

Which Scope Should You Choose: Fixed vs Variable Scopes

Choosing the best riflescope can be a difficult task if you are new to the game. For example, which are better — fixed vs variable scopes?

The first thing that comes to mind is that you are in need of the best scope that suits your budget. There are thousands of options available and finding one to suit your budget leaves you with several factors you need to consider before buying one.

The first and most important question to ask when considering fixed vs variable scopes is for what purpose are you going to use the scope. Buying one based on other shooters’ experience is not always the right choice for you. An optic that works for one shooter may not work for you as one’s eyesight is different from another shooter’s eyesight. If you are using an AR-10, you can check the best scope for an AR-10 — I have reviewed four of them.

As you know there are two different types of scopes a variable tactical scope and a fixed scope and today the RifleScopeGuy is going to show you the differences between the two, leaving you to decide which one is best suited for your needs.

Two Types of Magnification

The Fixed Powered Scope

The fixed powered scope has a unique design as it only uses one specific power and you cannot change it. For example, the magnification can be set to 6 x 42. These scopes are more reliable than your variable type of scope. However, they do have some disadvantages you cannot change the power when needed. The advantage is that the fixed scope gives you a brighter and clearer view. The reason for this is that it does not have different lenses for the light to emit through the scope.

The Variable Tactical Scope:

When it comes to shooting the variable tactical scope is more versatile to use as the scopes designed with variable power. You can change the magnification settings to suit your different situations from hunting or shooting for fun at the shooting range.

The Basic Terminology Found In Both Scopes

The only difference between a fixed and variable scope is the magnification settings. The rest of the terminology is basic for both scopes as the following is important when choosing either one.

1. The Objective Lens

The objective diameter is the measurement of the lens found on the end of your scope. They can vary in size from 32 – 50 mm. The only thing that the objective lens does is to gather the image of your target and allows the light to transmit through the scope. The larger the objective lens the more lights transmitted to your eye. The only disadvantage is that the bigger the objective lens is the heavier the scopes designed and needs a higher position.

The objective lens works as follow: a standard 40mm objective lens at 5-x power gives you an exit pupil of 8mm when viewing your target through the ocular lens. This means that the objective lens diameters divided by the magnification and equals the diameter of the exit pupil.

2. The Reticle

The different brands available have different reticles and each shooter has their own preference. You can buy a scope with a mil-dot, MOA, Bullet Drop Compensate for long-range shooting, and standard duplex reticles. The main purpose of the reticle also known as the crosshair is to provide you with a centralized aiming point as each one caters for different shooting purposes.

When you look at the hunting crosshair they are made of wire, but the glass-etched ones are also becoming very popular, as they are precise and durable.

3. A Critical Measurement is the Eye Relief

When deciding on your scope the eye reliefs critical. A handgun scope only has a 20-inch eye relief and suitable to use for short distance shooting. While shooting with a rifle or shotgun that has a powerful recoil needs and optic that gives you a longer eye relief range.

4. The Field of View Varies From One Brand to Another

If you are planning to hunt you, need a wide field of view as you will able to pick your target quickly? If you plan to shoot long distances, the F.O.V is not that critical. The field of view varies from one brand to another and best to read the available specs when buying your scope.

5. The Importance of Light Transmission

Light Transmission is the amount of light transmitted through the scopes lens. Some of the best riflescopes can give you a light transmission of up to 95%. This means that the scope transmits through 95% of light without reflecting it away from the lens. Here magnification plays an important role, as a scope with a good light transmission is easier on your eye to focus when used during the day.

6. The Importance of Parallax Adjustment

When you look at your target at a distance greater than 100 yards parallax occurs either in front or behind the reticle. Once you move your eye from the optical axis of the scope, parallax occurs. This is an important feature to have when buying a long-range scope, as they are equipped with either an adjustable objective or a side focus parallax. With an adjustable objective, you can focus down closer when shooting at short distances. With a side focus adjustment, you do not need to move your head or rifle too much.

7. The Turrets

You can buy a riflescope with exposed or covered turrets. You can buy them in ½ MOA up to ⅛ MOA adjustments. Each adjustment is suitable for different needs and you use the exposed turret for target shooting, as it’s easier to change the distance of the target. Closed turrets are great for hunting as once the scopes sighted there is no need of changing it.

8. The Exit Pupil

Exit pupil measurements important when shooting, especially when the light begins to fade as the higher the exit pupil it allows you to see through the scope for longer. You can measure the exit pupil as follow: you take the objective lens and divide the power magnification. When buying a 3-9×40-magnification scope you take the 40/9 and this equals to 4.4mm of light.

Final Thoughts

As you can see there, are different factors to consider when considering fixed vs variable scopes. Another topic that many people argue about is the brand. At the RifleScopeGuy, you can buy different famous brands such as Leupold, Nikon, Vortex, Burris, and Bushnell.

Knowing what you are going to use your scope for is the first step. And the second step is to know your basic terminology. When buying the best riflescope, whether it be a fixed or variable one, the choice is still yours.

Hunting Blinds: What to Know and What to Look For

Hunting blinds are a common and effective way that a hunter can shield himself from the animal he is after and minimize the chances of being detected.

Often, a deer hunter will use climbing equipment to perch himself in a tree and use that as cover, but there are several grounded blinds available for purchase that are easy to pack in, set up, and move around while in the field. Some require the hunter to lie down while others allow for sitting and kneeling/standing.

I have been using the Harter’s Ground Blind for several years now with great success. Here, we’ll discuss different types of blinds with examples for you to check out before making a purchase.

Hunting Blinds: What to know and what to look for

  • Deer hunting blinds

    • Portable- Portable blinds are the most common, and work best for most hunters as they can be packed in and out, and moved from spot to spot quickly. They range in size from small to large enough to fit two to three hunters  and have shooting holes built-in. They set up like a tent with stakes and a mesh lining, typically weighing between ten and twenty pounds. A good blind will provide 360-degree shooting capabilities and vision while maintaining disguise from all angles.
    • Permanent- When thinking of permanent blinds, picture a treehouse that a father might build for his kids. Some are made of wood and built on stilts, giving the hunter an extended range of sight, while others  sit on the ground. Permanent hunting blinds will require power tools to assemble, but are durable and will last many years. Permanent blinds are only doable if you own the hunting property, or have an arrangement worked out with the landowner, as they cannot be packed in and out and require an immense amount of labor to put together. Here is a video on setting up permanent hunting blinds.

While they are more comfortable and can be modified to your specific setup and preferences, it’s quite an investment. Some require the purchase of an elevated hunting tower to serve as the base of the blind pod. If you are looking into buying a permanent hunting blind for your property.

  • Tree stand blinds

These are often not much more than a skirt to go around a hunting chair or platform already built into the tree. The benefit of these hunting blinds is that they provide an elevated viewing and shooting area. You will need additional gear to climb the tree and to set up a seating area. Be sure you have fastened the skirt on securely before setting up shop, especially if it’s windy outside.

  • Duck hunting blinds

Duck hunting blinds are similar to deer hunting blinds but designed for waterside landscapes. Often they are designed to look like the tall reeds and plant life that waterfowl thrive in, and feature wider shooting holes that often run the length of the tent’s long side. Around fifteen pounds in weight, give or take, duck hunting blinds are quick to set up and break down.

However, you can build your own duck blind by building a pit deep into the ground using boxes that are built to resemble a 30-gallon oil drum that has been shaped into the landscape. Be sure to put a wooden cover on it so that it won’t fill up with rain when not in use. Again, this is only effective if you are always hunting the same spot.

Conclusion

Personally, I refuse to hunt without a blind, mostly because in addition to camouflage they also provide shelter. You can bring a cooler of beer, food, and other necessities for the hunt and keep it hidden away, and if it rains or is very windy you’ll have protection from the elements.

I don’t own land, so my hunting is done on public land where I have to truck in my blind each time, so I try to keep the process simple by using a tent-like blind with a hunting chair and always bring a blanket. While I’ve always been partial to Harter’s, Ameristep makes many quality products that are affordable and easy to set up.

Have ideas or product recommendations? Share here in the comments and let’s get a discussion going, and don’t forget to blast this article out on social media if you’ve enjoyed it.

3 Best Duck Call for the Money — Reviews

Now that we’ve covered the basics of duck calls, you should have an idea of what is the best duck call for your situation.

Duck calls emit different noises based on how they are used, and take practice to master, but are the single most effective hunting accessory for increasing your chances of bagging a duck.

I’ve used many different calls over the years, and have compiled my favorites in this list. Obviously, I’m a big fan of Duck Commander. Their products have been the most consistent and well-rounded that I’ve ever used.

Here, we’ll take a look at three of their best duck calls and their pros/cons, helping you make a decision on which one is best for you.

Best Duck Call Reviews

Things to consider when buying a duck call

  • There are some cheap options out there, but many of these will stick and become clogged with spit very quickly, leaving you high and dry just when need to make that killer call. By spending a little more upfront you’ll save time and stress immediately, and money down the line as you won’t have to buy a replacement very often
  • Consider the type of duck, the length of hunting days/trips, and experience level of the hunter before making a purchase. I strongly recommend a two or three reed duck call for most circumstances, although there are some decent one reeders

Top Our Pick For Best Duck Call For The Money 2017

Top 3 Best Duck Call For The Money 2017

This is my review about 3 duck call for hunting, it will help you find the best for the money. Check out it:

1. Duck Commander- Triple Threat- Duck Hunting Call New

Duck Commander ~ Triple Threat ~ Duck Hunting Call New

This three-reed device is ideal for two groups of hunters – beginners who need multiple reeds to practice the pitch, and experienced hunters looking for multiple calls to track a mallard hen.

The system is easy to learn and tune, ideal for camping and long days out in the field. Because the call is so easy to blow, it doesn’t require much practice before actual use It’s consistency and accuracy make this call an industry standard because as it holds a tune with little maintenance.

I recommend cleaning out the spit every few hours to prevent the call from sticking and clogging. Also, be careful of blowing too hard – this can make a high-pitched squeal sound that will annoy both you and the ducks.

If you’re in the middle of some action and it starts sticking, try using different reeds because odds are that only one or two of the reeds will be sticking and the others will work just fine.

This can also happen during cold weather, so do your best to apply some body heat to the call when not in use. It works well in rain, unlike many calls. That’s the benefit of buying this call instead of a cheaper one, it has more durability and versatility.

2. Duck Commander Wood Duck Call

Duck Commander Wood Duck Call

First and foremost, this best duck call for the hunting is meant to emulate the ‘wood duck’, it is not made of wood. It’s made of durable plastic and intended to be very specific. Hence only one reed. As far as versatility, this is not the best product, but if you’re going after ”woodies”, it’s call is incredibly accurate and consistent, you can’t beat it.

Duck Commander is a reputable brand that has mastered their niche, and it shows with this call. The sound is high pitched and replicates the sounds made by the wood duck as they sit on the water.

It does not require an immense amount of air pressure to call, but you’ll want to be consistent with how hard you blow if you’re calling differently each time the woodies won’t come in.

I frequently tell people to buy this as a gift for children or new hunters, because woodies are so common that they can practice at home or a nearby lake before heading out on a hunt.

3. MOJO Outdoors Baby Mojo Mallard Duck Decoy

Duck Commander Uncle Si Duck Call

The Uncle Si is perhaps the easiest call to blow on the market.

With moderate force, this call is extremely loud and great for big lakes or wide open areas. The volume level also makes it best duck call for beginners, because it doesn’t take much practice to perfect. If you are hunting in an area where there may be other noises (from animals or otherwise), this is a great call because the ducks will be able to hear it no matter what. It’s raspy, giving it an authentic flare that will beckon to ducks anywhere in the nearby vicinity.

What makes this one of the best duck calls is that you get exactly what you pay for. A sharp call, that is easy to clean and performs well in all types of weather. You’ll be replicating the call made while the duck is sitting, attracting it in to your decoys.

Because it is a single reed duck call, it can become clogged with spit, but it’s easy to clear out and only takes a moment. If you are a collector of duck calls or have several of them on a lanyard, the Uncle Si duck call is definitely a good add-on.

Duck Commander makes their products in Louisiana, meaning they are built with American quality and standards and will ship quickly. It comes apart easily, which is good when cleaning but just be sure it is secured when you’re out in the field so as to avoid having issues.

Head To Head Comparison Of 3 Best Duck Call

These three Duck Commander calls are diverse, and best for different situations. I’ll break those down real quick here:

  • Use the Triple Threat for chasing mallard hens. Master, it’s three reeds and enjoys its versatility in the field. This is the best duck call for experienced hunters who have a routine down.
  • Use the Wood Duck for practice, and generic field uses. It’s also a great gift because any duck hunter will be able to find a use for it. No duck call collection is complete without a wood duck call.
  • Use the Uncle Si for big lakes and the wide-open spaces that surround them. It’s great for beginners and louder situations.
  • Overall, the best duck call reviewed here is the Triple Threat. It offers features that the other two don’t, putting it in a class full of calls that are much more expensive than this one. Also, it will last a long time. Because these products are made in the USA, if you buy now it will be yours within a week’s time. This is good duck call from Duck Commander or otherwise.

Conclusion

The best duck calls are the ones that you can count on to perform even in inclement weather, bringing ducks in quickly. A good call will bring them right to you. I’ve used the Triple Threat from my back porch and had ducks walking right up through the lawn.

You can learn how to use a duck call to know about it.

Don’t overuse the call, study what the ducks do and replicate it. I’d like to hear about your favorite duck calls, please post here in the comments so we can keep this discussion going! If you found this helpful, please share on social media as well. Thank you!

Learn How to Age a Deer in the Right Way

As an experienced hunter, one thing I’ve worked hard at improving over the years is knowing how to age a deer.

We all want to shoot the biggest buck possible, with the best set of antlers, and with years in the field comes the wisdom to which age class a deer is part of.

I manage a small whitetail property, and the last thing I want to do is take out all of the 2 ½-year-old bucks before they age and reach prime antler range. Here, we’ll discuss tips on how to age a deer.

And i wrote a article about how to find a deer sheds, it is helpful, let's read it.

How to age a deer

1. Young bucks (1 ½ years)

You can tell a young buck as their antlers won’t extend past the ears. They also tend to have a slim, tight body shape as judged by looking at their belly, and at the fact that during the rut they won’t have a bulky Here are some great photos of deer in different age ranges

Take a look at the body size. If it looks about average and has only those small antlers, it’s a young one. The tarsal glands will appear fresh and clean, along with the buck’s facial features.

Its stride may appear a bit clumsy and nervous as well

2. 2 ½ to 3 years

This is the age when it can be a bit confusing because the deer’s body size is approaching what it will be for the remainder of its life. Here’s a hint: look at its belly.

How close it hanging to the ribs and organs? At 2 ½ years, it will still appear thin and youthful. The buck’s movement and stance may still appear a bit awkward and frail, as it hasn’t yet acquired a life’s worth of muscle

Without looking at the antlers, if the buck looks like a full-grown doe but not quite an adult buck, you’re dealing with a buck in the 2-3 year range and its best to let it walk.

I encourage hunters to give themselves that extra second before shooting to look at the antlers and body shape, whenever possible, in order to spare the young ones and make sure they are bagging a trophy. Here is a video about aging deer in the wild:

3. 3 ½ to 4 years

At this point in the buck’s life, it is beginning to develop defining muscle characteristics and appear as a full-fledged adult.

The neck is beginning to swell during the rut and tarsals will show some wear and tear. The stomach will begin to sag a bit, and the neck will begin to meld itself into the shoulder with muscle in a noticeable fashion.

It’s stance and movement have stabilized and are beginning to resemble that of an older buck

The best way to tell if the buck is in this age range is to look at its rack and body characteristics.

Size wise, it will appear older and more fully developed, but by honing in on specific features a hunter can tell that this animal still has a couple years to go before its fully ready

4. 4 ½ years

By this point, the rack and body are developed to the point of resembling a fully aged buck.

When learning how to age a deer in this range, look at the legs first. Instead of the frail and weak stance of younger bucks, those in this age range will feature muscle and strength in their legs and stance, which will also be reflected in their noticeably intentional movement.

The stomach has begun to sag quite a bit, and the entire body weighs enough that the buck will appear to lean backward or have to settle itself when standing still

5. 5 ½-year-old bucks (Primetime!)

This is what we’ve been waiting for, and the reason why we pass on younger bucks.

Take photos of the buck, particularly its developed rack and fully shaped body. A buck that is this old will likely have a full-fledged pot belly and legs that are stocky enough at the top to resemble those of a much less agile creature. 

And the best way to have good target let's use best shooting sticks for hunting.

At this point, you’ll want to take your shot whenever you have the opportunity.

Look for a bulbous nose, muscles protruding the entire body and loose skin. Their movements are direct and well thought out, making these bucks quite a prize for those of us lucky enough to find one

    Conclusion

    Just writing about older bucks gets me excited for hunting season. Discussing how to age a deer is one of my favorite pastimes, and I look forward to hearing your thoughts in the comments.

    I am a stickler for ethical and educated hunting, and always encourage the sharing of valuable educational materials. Best handgun safe is recent my post to tell you 5 gun safe to storage your gun safety, check it out.

    With that in mind, please share this article on social media if you found it helpful. Remember, next time you’re in the field, take that extra moment to appreciate that you are hunting an aged buck and let the younger ones scurry along. It benefits us all in the end.

    Visit Us On FacebookVisit Us On PinterestCheck Our Feed