Ruger SP101 vs GP100: Which is Better for Personal Protection?

Which pistol to carry for defense purposes is an important question. Over the years, I’ve switched between a number of different guns for carry purposes and to use at the range.

Two of them have stood out above the others as the most appropriate for general carry – the Ruger sp101 vs gp100.

sp101 vs gp100 ruger

sp101 vs gp100 ruger

I spent about ten years with an SP101 type model after it came to market in 1989 before recently switching to the GP100.

Today, I’ll tell you what I liked and didn’t like about both and we’ll compare the SP101 vs gp100 Ruger. Let’s get started.

The breakdown

The SP101 maintains the feel and functionality of classic concealed carry guns. It’s small, in the featherweight class, and easy to draw. 

  • The best thing about it in this case is that the gun handles like a high-performance weapon. It’s powerful, relatively easy to aim and shoot, and certainly is tough to detect before you draw
  • It comes as a 5-shot, 6-shot, or 8-shot
  • It has a strong recoil, though, and it does take a moment to position yourself before shooting. Those action shots in the movies where the character runs while drawing and shooting aren’t really that realistic with the SP101 – in actuality, there’s a good amount of kick and continuing to run in a straight line would be near impossible

Do you want check price? Check it here: 

The GP100 is actually a modernized version of what was known as the Security Six. Physically, the newer model is much cleaner and fires better. It is highly preferable to me in day-to-day situations. I keep urging my wife to get one too, because she is now jealous of mine. 

  • It has a comfortable feel to it and is certainly a featherweight at 2.2 pounds. It is popular with a handful of law enforcement departments around the world because of its versatility
  • Depending on the catalog number, this gun handles anything from the .357 Magnum to a .44 Special. It’s got a wide range of caliber fittings and barrel lengths, coming as a 5-shot, 6-shot, 7-shot, or 10-shot.
  • I’m not as big of a fan of the after-market support and add-ons for the GP100, this is one thing I really do love about the SP101.

Which is better for personal protection GP101 or SP101?

In short, the GP100 is a better gun for concealed carry and personal protection. The gun itself is an evolution of previous hand-held revolvers, marking an improvement upon them, and it has been modified even since as it fits different caliber and barrel lengths. The gun is more versatile and can be better fitted to your personal preferences.

I find it more comfortable in concealed mode, in fact I hardly even notice that it is there. I love .357 Magnums, and the flow of this gun throughout the loading and shooting process is very smooth.

The SP101 is more of a heavy-duty type small revolver. Over the years, it’s been used by police departments as a quick-grab backup weapon, and is designed for situations where it will be used by a highly trained professional.

I used it quite a bit at the range to get a good feel, and I’ve got to say that I was able to feel comfortable with the GP100 much faster than the SP101.

They are both great guns. But let’s say that you are carrying a gun for the instance when a bad guy pops out of nowhere and you (as a common citizen, not a police officer) have to react quickly and depend on your gun to perform every time. The GP100 is easier to handle and easier to shoot.

Amenities, action, and sights: Oh my!

Both of these handguns come in multiple versions, barrel lengths, and caliber, fit to taste.

What I really like about the GP100 is the shot capacity and variety of calibers. Almost all, with the exception of the GPF-840 and the 1757, are full shroud, which is a huge plus for me. I prefer one of the variations with adjustable sights, because I’m old school and like to try out many different options before settling on my emergency go-to.

Ruger GP 100 Match Champion (.357 Magnum)

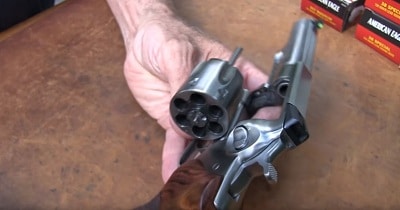
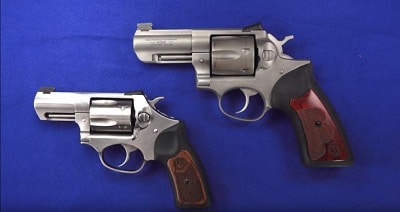
Ruger GP 100 Match Champion (.357 Magnum). Image from hickok45

The SP101 is a bit heavier than many other revolvers (not enough to cause a major disturbance, but if weight is your biggest factor, this is another reason to go with the GP 100). This gun does have a smooth double action, along with a bobbed hammer, two things I really like and that kept it at my waist for nearly ten years. It offers large, high-visibility sights, which I also loved. However, during rapid fire, I found I had a harder time tracking the sights than I have with the GP100.

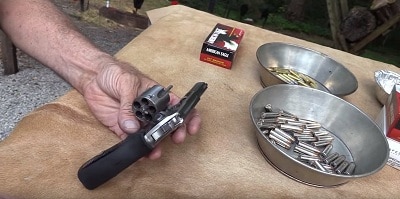
Ruger SP101 .357 Magnum. Image from hickok45

Scorecard

As a review, let’s take a look at the points each gun has in its category here at the end of the comparison:

GP100

  • More options for customization
  • Better sight tracking during rapid fire
  • Variety of calibers is a big plus
  • Shot capacity is a big plus
  • Definite proof that it has gotten better over the years

SP101

  • Better after-market support and add-ons.
  • Smooth double action and bobbed hammer making the shooting fun and painless.
  • Very consistent, but with a higher recoil issue and (I felt) tougher to master.

Conclusion

Both the GP100 and the SP101 are fine small size revolvers to keep by your side in concealed carry mode.

Both can get the job the done.

But what has really drawn me to switch from the SP101 to the GP100 is the ease of comfortability I felt when learning the gun that was new to me. It takes a lot to get an old timer like me to change his ways, but the GP100 is the best revolver I have ever shot. I’ll keep it by my side until I die.

If you have enjoyed this article, please share on social media. I’d love to see how far we can push the word of the GP100. Feel free to leave comments below, let’s get a discussion going!. Oh one thing, if you need the gun safe for this ruger gun, you can take a look my post about best handgun safe for the money

What is the Different Between Rimfire vs Centerfire?

One of the more common questions asked by new shooters is this: What is the difference between rimfire vs. centerfire?

And, beyond that, why should I choose one over the other? Today we are going to dissect these two types of ammo and determine which one is better for your specific situation.

I personally prefer centerfire based on my shooting style, technique, and hobbies, but there are still small-cartridge situations where rimfire is better. Let’s take a look.

what is the different between Rimfire vs Centerfire

what is the different between Rimfire vs Centerfire

Rimfire vs. Centerfire: What the hell are they?

Rimfire and centerfire refer to the categories of primer ignition systems, basically, what gets the whole process of firing the bullet going.

The explosion caused by the lighting of the primer causes the gunpowder to react and project the bullet forward out of the barrel of the gun. Every single time a gun is fired, this is what happens, regardless of whether a rimfire or centerfire cartridge is being used.

With centerfire cartridges, the explosion is concentrated more centrally in the middle of the cartridge. This creates a more consistent firing of the bullet. Because of this increase in performance, the professionals in the police and military are preferring centerfire cartridges.

Rimfire cartridges see the explosion overtaking more of the cartridge as it is tripped at the rim. The pressure on the bullet isn’t as concentrated on the center of it, and I’ve heard tale of rimfire cartridges not firing with the power of their centerfire counterparts.

Rimfire vs Centerfire: How to they work?

Centerfire cartridges locate the primer in the center of the cartridge case head. These are much more common these days as cartridge size preference trends towards larger sizes. You really won’t find anything other than centerfire cartridges in larger or even medium sizes these days.

The move towards centerfire cartridges is based largely on the fact that they are more reliable in heavy duty situations. Police, military, and serious hunters and shooters have pretty much switched entirely to centerfire cartridges based on their dependability, consistency, and reliability.

Because of this, and because of the fact that so many shooters want to emulate the pros, most shops will stock a wide variety of centerfire cartridges while only stocking a minimal amount of rimfire cartridges.

Rimfire cartridges are pretty much a thing of the past, except for certain gun models. A rimfire cartridge works like this: the firing pin ignites the primer by striking the cartridge’s rim, causing friction and igniting the blast.

What is the difference between Rimfire vs Centerfire?

Basically, the difference starts with the power issues that we’ve discussed above. Rimfire cartridges are cheaper, for sure, and have lower recoil than centerfire cartridges.

One of the biggest drawbacks of rimfire cartridges is how hard they are to find. The older guys that I grew up with have been buying all the stock they can for fear of it no longer being available anywhere that they shop. As a result of this, hardly any new shooters are using rimfire cartridges.

Centerfire cartridges have higher recoil and are more expensive. But, because they are so widely available and there is no fear of them all being bought out or discontinued, the market price will probably eventually drop significantly just based on supply and demand.

So what is the better between Rimfire vs Centerfire?

I highly urge you, even if you are a long-time shooter, to make the switch to centerfire cartridges. The long term sustainability is much better and you’ll find that you spend less money over time because of:

  • Availability
  • Higher amounts of fittings
  • More ability to share and match with other shooters

Who fits rimfire cartridges and who fits centerfire cartridges?

Rimfire cartridges are certainly not as prominent as they once were. Right now, 17 caliber and .22 caliber pistol and rifle cartridges can be found in rimfire variety, along with some shotgun cartridges that are small-bore.

You won’t find any game hunting cartridges using rimfire anymore. Beyond that, mostly just collectors’ items will fit rimfire cartridges. .22LR are the most frequently used rimfire cartridge fittings. You’ll also see them in WMR, Winchester Magnum, Hornady Mach 2, and Hornady Magnum. Not a ton of variety offered here!

For today’s pistol, rifle, and shotgun ammunition, most of what is commonly used will be centerfire. If you are looking for a specific rimfire cartridge, your best bet is going to be to shop online on a store’s website first before visiting in person just to make sure that they will stock it before you head out.

Conclusion

I hope you have gained a solid understanding of the differences between rimfire and centerfire cartridges.

Centerfire is the way of the future. Rimfire will likely continue on its slow and miserable decline.

What the high-impact shooters of the world prefer is what goes, and you’ll be better off siding with them. I started using centerfire cartridges years ago because I predicted this trend after spending years in the military serving my country.

If you have enjoyed this article, please share on social media so that we can increase awareness of the differences between rimfire and centerfire cartridges and get more people switched over.

Feel free to share your comments in the section below and we’ll get a conversation going. Take care!

7 Frequently Asked Questions You Need To Know About Rifle Scopes

So you’re looking into rifle scopes. You’ve decided that you need increased visibility when out in the field, making your gun that much more effective.

unlimited guide about rifle scope

Unlimited guide about rifle scope

This is your guide all about rifle scopes, how to use them, how to measure them, and how to read the measurements.

I’ve been using rifle scopes for years, and have tried many low and high power scopes. These days, I prefer the lower power scopes whenever they are applicable. Let’s take a look at what rifle scopes can do for you.

In this post, we will help you find the answer for 7 question about rifle scopes: (use quick navigation to jump to answer)

  • 1. Type of rifle scope
  • 2. How does a Rifle Scope work
  • 3. How are Rifle Scope Measured?
  • 4. What do the numbers on a rifle scope signify?
  • 5. Best times for Hight and Low Power rifle scope
  • 6. What is the magnification? And how to read Scope Magnification?
  • 7. How much Scope Manification do I need?

1. Types Of Rifle Scopes

6.5 creedmoor with rifle

Rifle scopes are meant to provide magnification on the rifle where a gun sight can’t, which is the main difference between the two.

Rifle scopes are distinguished by how they help the shooter hone in on their target, and typically fall into one of the following categories:

  • Aperture sights require the shooter to set the front sight in line with the ring during the aiming process. The rear sight is typically a ring
  • Open sights are similar in that the shooter must line of front and rear sights. However, instead of a ring for the rear sight, it appears as looking like the letter “V.”
  • Dotted and laser sights help the shooter aim by pointing directly to the target with a noted mark. Red dot sights show a red dot on the target without actually sending any light out of the scope, making them ideal for hunting while maintaining camouflage. Laser sights actually project the image onto the target via laser

2. How Does A Rifle Scope Work?

Rifle scopes are elongated spaces for magnification lenses.

Their overall goal is to increase the line of sight on a shooter’s target through the magnification, and they work kind of a like high-tech magnifying glass. The central part of the rifle scope is called the main tube. This part holds the magnifying lenses that actually make the scope function properly. They also typically have some type of reticle for noting the point of impact of a bullet on the target.

How Does A Rifle Scope Work

How Does A Rifle Scope Work

Rifle scopes are attached to the top of the rifle and have an erector tube working between the reticle and adjustment knobs. This is how the scope adjusts its views, as the tube is moved back and forth by the shooter by the knobs. The shooter can zoom in on the target to their preference, finalize their aim, and take the shot. The eyepiece of the rifle scope is called the ocular assembly. The diopter here brings the shooter’s line of sight into focus, which is adjusted by the knobs. This all sounds very technical, but it basically operates like a telescope. The image, in this case the target, is fetched by the scope and brought into focus by the rest of the components. In the end, the shooter has much better visibility and a result, improved accuracy. Rifle scopes are preferable for long range shooting both in the field and at practice ranges

This video Airsoft GI talk about how does a rifle scope work:

3. What Do The Numbers Mean On A Rifle Scope?

One of Best Scopes For Ruger 10/22

One of Best Scopes For Ruger 10/22

This is where rifle scopes can be quite confusing. Because of their different parts, the scope improves the shooter’s line of sight in multiple ways.

Those ways are reflected in the measurement equation.

The measurement of rifle scopes is broken down into segments that basically translate a math equation.

The first number of note is the first digit, which depicts the level of magnification the scope presents.

So if a scope begins with the number “3”, that means that the target appears 3 times closer than it would without the scope.

The next digit is a dash, followed by a number representing ‘power.’ So if the number is 6, the power of the scope brings the target into focus appearing six times closer to the shooter than it would without a scope.

You’ll then have an ‘X’ followed by a number such as ’40.’ This last number refers to the diameter of the scope as measured in millimeters. Written out completely, this expression would read 3-6x40. Now you know what all those numbers mean!

What does 3-9x40 mean for a rifle scope:

In a 3-9X40 scope, the 3 means 3 power, or 3X. Clearly, this means that the image you see through the scope appears three times (3X) closer than it does with your naked eye. The 9 means nine power, or nine times (9X) closer than it appears with your naked eye. The (40) in this number is the objective lens diameter in millimeters. This is a variable scope because you can vary the magnification of the scope from 3 to 9, stopping anywhere in between. You would describe this scope as a "three to nine by forty." Some scopes have a 3x magnification range such as a 3-9. Some have 4 or more as in a 4-12. . The larger the magnification range the more you will pay, but it makes for a more versatile scope. I've been spoiled by them.

4. Best Times For High And Low Power Rifle Scope

There are different scopes for different hunting situations. Shooters will want a lower power scope, in most circumstances, for short range shooting.

Low power scopes are dialed down to their lowest magnification level possible, which helps to keep targets in focus that aren’t very far away. Police and armed military personnel often prefer low power scopes in typical day-to-day situations where they aren’t going to fire at targets that are hundreds of feet away.

High power rifle scopes are ideal for long-range shooting. They have the ability to, through multiple levels of magnification, increase the size of a target while making it appear to be closer than it actually is.

This gives the shooter the ability to not only have an easier time aiming at their target, but to pinpoint the exact area that they want to shoot. For example, the right side versus the left side, or a shoulder shot, etc.

5. What Is The Magnification? And How To Read Scope Magnification?

As we’ve stated here, the best way to read lens magnification is to determine how amplified you want your vision of the target to be.

What Is The Magnification And How To Read Scope Magnification

What Is The Magnification And How To Read Scope Magnification

If you want the target to appear closer and also be bigger in your eye, focus on the entire sequence of numbers used to describe the rifle scope. Is the scope going to provide 3 levels of magnification, making the target highly visible from hundreds of yards away?

You’ll notice that the when reading lens magnification, the factors multiple each other. This is because they each complement the work of the other to provide a better shot.

Making a target appear larger while also making it appear closer provides more assistance to the hunter than simply zooming in on its head.

Read the listing like you read the description of your gun. 3-9x40 equals 3 times magniciation, 9 times closer to the shooter, all viewed through a lens that is 40 millimeters in diameter.

6. How Much Scope Magnification Do I Need?

The level of scope magnification needed depends mostly on how far away the target is going to be.

For closer targets, you’ll want a low power rifle scope that doesn’t severely alter the perception of the target.

It allows the target to appear mostly as it is, with slight enhancements to hone in on exactly where you want to shoot it.

You’ll want to increase the levels of magnification in line with targets getting further and further away, or if the targets are incredibly small.

Smaller targets need the amplification that makes them appear to be bigger than they are, allowing you to specifically shoot where you want to hit the target.

7. How Are Rifle Scopes Measured?

unlimited guide about rifle scope

How Are Rifle Scopes Measured?

Rifle scopes are measured by how many times greater one’s vision and is of their target compared to what it would be with the naked eye. Levels of magnification are determined in comparison to the average person’s eyesight.

You may have a scope that improves the size of the image by 3 times, while making it appear 6 times closer to you than it actually is. You may have a scope that is 40 millimeters in diameter, or it may be bigger or smaller. In total, rifle scopes are measured by magnification and size, and depicted in the written form we’ll go over next.

8. Understanding About Adjustable Objective Scopes

Adjustable objective scopes can be somewhat confusing, but they really don’t have to be. Many shooters don’t fully understand them, but in this article, we will explain these scopes for you.

When a scope has an adjustable objective, it simply means that it has an adjustable parallax. Parallax can be confusing as well. Essentially, parallax becomes a problem when shooting at longer distances. If your eye, the reticle, and the target aren’t lined up, it will appear that the reticle is somewhere that it actually isn’t.

Many scopes come with a set distance at which there will be no parallax. Essentially, the lenses of the scope are lined up in a way that the reticle will be perfect at that distance. Adjustable objective scopes allow you to change this distance.

In order to effectively use an adjustable objective scope, you must know the distance that you’re shooting at. You’ll need a rangefinder or a known distance target to do this. However, once you’ve zeroed the scope in and identified the distance, you’ll be able to adjust the rifle to a point where it should be parallax free at the specified distance. Once the scope is parallax free, it doesn’t really matter where your head is placed. It eliminates the need for your eye to be perfectly lined up with the scope.

For precision shooting, this is a huge positive. Military snipers adjust the parallax of their scopes because it’s essential to have a precisely placed shot. However, for hunters, this usually isn’t a huge problem, because extremely precise shot placement isn’t necessary.

The biggest pros of an adjustable objective scope are that it allows you to be much more accurate, and it will make shooting at longer distances easier. On scopes with a higher magnification range, this could be extremely important, because parallax will be more noticeable at greater distance and at greater magnification.

The cons of this feature is that it can make the scope more confusing to use, and it may be completely unnecessary. With the additional knob, it may make the scope a little more confusing to use. You may find yourself messing with the settings too much, and eventually missing a shot that you would normall hit.

The only people who really should use adjustable objective scopes are those who require extreme accuracy. As we mentioned before, it is really only necessary for snipers and those who partake in precision shooting. If you’re a hunter, you can get by without it, but you could also use it if you’d like. For instance, if you’re hunting at a specific distance, you could set your parallax ahead of time to make the shot that much easier.

Conclusion

Rifle scopes have completely changed the game for shooters. Low power scopes seem to be rising in popularity these days as hunters realize that having more power than they need in terms of eyesight isn’t always a good thing.

Sometimes, it’s best to just go with instincts instead of overdoing it with extras. I hope you have found this post helpful – if so, please share on social media and feel free to comment below. Ideas and experiences are the stepping stones of progression. The more people we get talking, the better our hunting skills will be!

A Fisherman’s Dream: The 5 Best Bait for Catfish

You want to know what does catfish like to eat? So, go on to find best bait to catch catfish in my post!

Hunting catfish is a long-time hobby of mine. My Dad started taking me to the coastal waters off the southern states of America when I was about ten years old. Back then, he only used one top of bait – shad.

best bait to catch catfish

best bait to catch catfish

Usually live, always a bit gross to me as a kid. But I got the hang of it, and over the years have begun trying out other types of baits with much success.

Here is a list of the top best catfish bait you need to know for success.

1.Dips And Blends

Another thing my Dad taught me was to be very specific about the types of dips I put on the rod.

I have a hard time trusting most of the store-bought kinds, except for a few that I’ve seen in stores down in Georgia that I can’t seem to find anywhere else.

The best dips are homemade by expert fisherman. These are one of the top best catfish bait you can find anywhere, because the person who blended the dip most likely did so for their regional fishing spots.

This dip will be effective in luring catfish in those spots because it will be made of local ingredients that the fish is already accustomed to.

In order to find a good local dip, I recommend doing one of three things:

  • Stop by a local (I mean truly local, not a chain or corporate shop) fisherman’s store or outdoor outfitter and ask at the counter. The clerk will most likely be able to point you in the right direction.
  • Fish with a longtime local. You might get lucky and get to try some of their personal dip or ask for a recommendation
  • Do some experimenting and come up with one of your own. If you know the local waters around your home pretty well and have had success with different baits, use your knowledge to create a blend of local products that you suspect will do well in the water. It may take a few fishing trips to do some experimenting and some A/B testing, but with time you’ll come up with a formula that really works.

2. Worm

The old stand-by is the night crawler. Worms are cheap, easy to transport, and easy to bait.

The biggest plus to worms is that they are relatively consistent across the board. Not the highest conversion rate, but you can take them to different streams and bodies of water and pretty much expect the same result each time.

fishing with wroms

fishing with wroms

You can stop into just about any outdoorsmen store and pick up some bait. Worms are best bait for catfish in rivers

My favorite thing to do when baiting with night crawlers is to stop in some little Podunk gas station or general store in a small town near where I’m heading out to fish, and buy some there.

I’ve heard some of the best stories about fishing and gotten some incredible tips in places like this. A few times I’ve gotten lucky and had a few beers thrown in with my order. 

3. Sea Life

I know I talked about shad up above, and I really stand by shad as far as being a reliable bait. Here are a few other fish-based baits that are worth a try:

  • Crawfish. I also have used crawfish a few times, and really liked the results. I’ve got a buddy who swears by crawfish.
  • Shrimp. Got some rotten shrimp in your freezer? Maybe you can stop by the grocery store and grab some on your way to the water. Rotten shrimp make great catfish bait because they can sense them from far away. The only problem is, so can you. I thinks it's the best bait for catfish!
  • Spam. Ok, so this isn’t seafood, but it’s an animal product that works well on the hook. Plus, it’s super cheap and available at any respectable grocery store.

Here is video fishing with Shrimp

4. House Product

There are a number of random things that you probably have sitting around the house that will make perfect catfish bait. Be careful about polluting the water:

I always strongly advise against using WD-40, soap, or any other cleaning product because you’re basically just being an asshole and infecting the water.

It’s one of those situations where you might benefit in the short term, but you’re hurting everyone’s chances (as well as Mother Nature’s) down the line. Part of responsible fishing is conservation.

That said, here are some good household items to try:

  • Junk food such as French fries, candy, and fried chicken. Bait these suckers up and toss the line into the water. It’s kind of a guessing game as to whether it’ll work that day, but my overall success with junk food is about 75%. Fries are the best
  • Dog food. You’ll need to use the canned variety that is moist and mushy, not the kibble kind. Kibble can’t get on that line. Put a couple pieces of canned dog food on your hook and fish will come swimming right in.
  • Random animal parts and garlic. Coat some cow or chicken parts with garlic and have at it. For whatever reason, fish like garlic. I guess that makes me a fish!

· Some other ideas can be found here.

5. Marshmallows

I’m always surprised that more people haven’t tried marshmallows as one of the best top catfish baits. They’re so sweet, that nearly any living creature is attracted to them.

Plus they’re really easy to get on the line and as long as you’re using the big kind, they should last a bit before being swept off the line. Hopefully, long enough to land you a catfish!

Conclusion

Catfish are one of the most desired fish in the sea. These top best catfish baits will give you plenty of things to try and see what works in the areas that you fish.

Do you have some suggestions of good bait that has worked well for you? Please leave a comment and let us know so that we can try them to.

If you enjoyed this article, blast it out on your social channels so that more people will try these things out and we can increase enjoyment in the great sport of fishing. And if you are looking a safe for your gun, check my recent post out!!!

Which Is Better Between 6.5 Creedmoor vs .308 Winchester?

You want to know which is better between 6.5 Creedmoor vs .308 Winchester?

There has been much talk lately about the performance of the 6.5 Creedmoor vs .308 Winchester. In my opinion, the 6.5 Creedmoor is a better cartridge overall. This is because of its ballistic capabilities and the fact that it is slightly smaller than the .308.

I happen to be fond of the little red tip as well, which is not present on the .308. In this article I’m going to show you why the 6.5 Creedmoor is the superior option, and why you should look for it to play an increasingly large role in the market, in everything from store shelf presence to gun fitting, going forward.

Overall Performance

When shooting, both cartridges perform well and are effective for hunting and target shooting at the range. But for medium to long-range shooting, the 6.5 Creedmoor is much better because it uses slightly skinnier bullets that make it downrange at a faster rate of speed than the other, and I’ve seen multiple times this have a direct impact on accuracy.

The .308 just can’t quite keep up on shots over 700 yards is what I’ve noticed. The longer the shot, the bigger the difference there is between the two cartridges. The .308 Winchester is incredibly well-known in the shooting world. Pretty much everyone has experience with them.

If you’re going for something easy that is simple to get opinions on, fit to a gun, ammo for, or anything else, this is the winner here. But once we start to look a little deeper into the two cartridge types, some major points begin to rise. The 6.5 Creedmoor is a better cartridge, plain and simple. For long-range shooting, for accuracy, for speed. Dare I say, even for consistency with loading and gun powder?

What About Build Of .308 Winchester and 6.5 Creedmoor.

The shoulder is sharper on the 6.5 Creedmoor. This also factors into accuracy. If you spend a significant amount of time out in the field with both cartridges, you’ll notice that the brass lasts longer in the Creedmoor. The Creedmoor is based on a .30 TC Case, unlike the .308.

I do have to give the .308 credit for its consistency, however. Every time I’ve used it, or been hunting with someone who is, I feel like I know what to expect with each shot, from load to follow through. When I start getting carried away distance-wise with the 6.5 Creedmoor, I frequently notice some variabilities in the overall feel of the shot. This is particularly true when loading.

The case itself, on both options, is incredibly sturdy. They’ll be dependable whenever you need them and are worth the money. I don’t want to make it seem like I hate the .308 Winchester. I just think that it has had its time, and over the last ten years or more we’ve started to see the rise of a superior option. Particularly for distance accuracy, as I’ll note repeatedly.

I’ll give the .308 the edge for range shooting. It’s more consistent on shorter to mid-range shots and can be used in more guns. And because just about everyone has experience with them, these cartridges are easy to find bullets for and an expert to assist you with loading or anything else that you need help with.

Shooting

The rising popularity of 6.5 mm cartridges is ensuring that shops will have more and more selections for the Creedmoor when it comes to bullets. Your choice of shot should be largely based on case outline. Again, the 6.5 Creedmoor is the winner here, particularly because as it grows in popularity, more options become available. Both cartridges will suffice just fine in the field. But if you’re hunting with someone using the other, you will notice differences over time.

Shooting with .308 Winchester
Video of https://www.youtube.com/watch?v=9e4s1cHQpZI

The 170+ grain measure of the .308 struggles with magazine limitations. I also seem to have better luck with the Creedmoor when it comes to powder. It shoots at a higher speed: a 140-grain shot sees 2710 fps with a superior BC of .526-.535. You ain’t going to get that with the .308!

The 6.5 Creedmoor has less recoil because it fires lighter bullets, making the shots easier on you over time. The .308 is the winner on the lifespan of the barrel, due to the fact that that the .605 has a smaller bore and shoots at higher speeds. It does tend to wear the barrel out.

Shooting with 6.5 Creedmoor group 900 yards
Video
of Ryan’s Range Report

If you are finding the safe for you gun, don’t hesitate to read the best handgun safe for the money to choose the good one

Versatility of 6.5 Creedmoor vs .308 Winchester

If you’re using a bolt action style rifle, .308 will be more apt to work with your gun. Obviously, this depends on what you’re using. But as the 6.5 Creedmoor becomes more popular, more rifle makers have started to make options that will accommodate. I’ve heard hunters say that .308 ammo is cheaper and more available (see video below), but this is going to be less and less of a problem as time moves along.

Since the 6.5 jumped into the spotlight, it has slowly gained momentum and traction. It’s versatility has increased in tune with that. Will it ever surpass the .308 Winchester in popularity? Probably not. Old hacks like me are stuck in our ways, in fact I’m one of the more progressive hunting types in my crew and the only one that currently prefers the 6.5 Creedmoor.

The Verdict About 6.5 Creedmoor vs .308 Winchester

As I’m sure I’ve made very clear throughout this article, I prefer the 6.5 Creedmoor over the .308 Winchester. It’s a better cartridge because of improved accuracy and spotting, particularly in long-range shooting. The .308 is the stuff of legend or lore these days, but sometimes it’s best that a legend passes the torch.

Down the line, the 6.5 Creedmoor will be increasingly fitted and common to more shooters’ tastes and hopefully we can wake up the rest to its superiority. And in my opinion, 6.5 Creedmoor is the best ammo for an AR-10 rifle.

If you enjoyed this article, please share on social media so that we can get the good word out! Perhaps you’re an old .308 guru – throw a comment down below and let’s get a conversation going.

Get a Perfect Shot! Learn How to Measure Length of Pull

Many new shooters may not quite grasp the concept or how to measure the length of pull. If you aren’t familiar with long guns, it’s probably not something you’ve spent time worrying about or measuring.

A long gun’s length of pull is the distance from the end of the gun up to the middle of the trigger.

When looking for the right gun, length of pull is one of the most critical measurements which will determine whether or not the gun will fit you.

Here, we’ll take a quick look at how to measure length of pull.

Chris Fort

What Goes into Determining Length of Pull?

There are a number of factors to consider when measuring a gun’s length of pull. How long is your neck? Are you in shape or do you have fat poofy cheeks? And how big are you overall as a person?

Your personal dimensions must coincide well with those of the gun you hope to use. What is the long gun’s drop at heel and drop at comb? Trapshooters does a really great job in this article of breaking down length of pull measurements.

  • Drop at heel refers to how much distance sits in between the butt of the gun and the line of sight.
  • Drop at comb refers to the distance that sits between the line of sight and the comb of the stock. In case you aren’t familiar with this, the comb of stock is the part of the gun where you rest your cheek, whether poofy or not.
  • One thing to note here: length of pull is not measured by the distance between your elbow and your thumb. My grandpa told me this when I was child, but it has been proven false. So, when someone tells you measuring length of pull is that simple, you can refute the claim!

Why Correct Length of Pull Matters

To optimize your shooting skills, having the correct length of pull is important because it allows for comfort and familiarity. Hunting is a sport of patience and repetition. Therefore, having a gun that is well suited to you along with the proper tools for the field will greatly increase your chances of success. Here is exactly why length of pull is important:

  • If the length of pull is too short, your line of sight can be impeded. Maybe it’s by the thumb coming into the field of vision during aiming, or maybe the gun just never sits quite right and getting the best aim is impossible.
  • When the length of pull is too long, accuracy is directly impacted. Your clothes may shift the aim by moving the butt of the gun. Or the gun may wobble slightly as you zero in because your arm isn’t able to properly situate the equipment.
  • Here is a great video on accurately measuring length of pull:

Measuring the Length of Pull

I always encourage young and new shooters to be professionally fitted to a gun for proper length of pull. That way, nothing is left to chance. They will likely run through several long guns until the perfect one that meets both your personal criteria (including budget) and the correct measurements is identified.

If you do choose to measure it yourself, remember to fit for comfort as much as you are fitting for measurements with a ruler or however you measure at home. It is critically important that the gun fits you – how much fun is doing an activity with improper equipment? Not very much!

It is possible to become comfortable with a gun’s length of pull even if it isn’t perfectly suited to you. This is much easier to do for experienced shooters and those that have spent their lives in the field trying out different long guns in different situations. Practice makes perfect, and experience makes comfort. That is my motto with shooting, and I encourage you to adapt that motto as well. For the newbies, get that gun measured from the middle of the trigger back to the buttstock and don’t settle for anything that doesn’t feel right!

Conclusion

how to measure length of pull
Stephen

As I’ve said many times before, shooting is all about comfort. Accuracy comes from comfort, and so does a budding passion for a life of hunting. Using a long gun with the correct length of pull measurements will put you on the right track for both of those. Double-check the measurements, especially if buying a new gun.

If you are looking for a scope for your shotgun, I have written a post about the three best shotgun scopes for hunting, so check it out.

If you’ve enjoyed this article, go ahead and share on your social media channels so that others can learn how to correctly measure length of pull and we can put those old rumors to bed for good. Leave any questions in the comments – we’ll get a discussion going.

What is the Correct Way to Shoulder a Shotgun

An accurate shot begins with a proper mount and shoulder of the shotgun. As you progress as a hunter, from beginner to a more experienced shooter, certain patterns will begin to take form. One of the most important of these patterns is finding the best way to shoulder a shotgun.

What Is The Correct Way To Shoulder A Shotgun
Mesa Tactical

How to Shoulder a Shotgun

Experienced shooters have their shouldering skills down to a science. It takes almost no effort to get the butt of the gun into the pocket and stance ready to go. I’ve been using the same shouldering stance since I started shooting, and I’m going to walk you through I there today. Let’s get started.

1. It starts with the feet

Just like in football, good footwork is incredibly important in shooting. The shoes that you wear should be well broken in field boots, or other active wear that are comfortable and flexible. Start by placing the feet about shoulder width apart. A little more than half of your body weight should be on the front foot, with knees bent and ready for action.

I usually draw a reference to bowling when describing the foot placement to people. I know this sounds weird, but hear me out – when bowling, it is important to position your body in a way that drives the ball toward to the pins you are aiming at. The same thing is true in shooting. Aim your back foot towards the target (as best you can).

  • Make sure your feet are loose and agile, should you need to shift. We’ll talk about this more in the next section.
  • Stand up straight at first, and then loosen yourself down into position with knees bent. This will keep you from standing to firm, standing to far forward, or not being ready to react and shift.
  • Don’t tense up. Part of accurate shooting and the correct way to shoulder a shotgun is to be loose and ready.
  • Here is a great quick video on shouldering a shotgun.

2. Body movement and flexibility

In shooting, it is important to keep all body movement symmetrical to the gun and to the rest of the body. The gun hits the pocket at a 45-degree angle. Your eyes peer over the top of the shotgun at the same angle. The back of the head is perpendicular to the spine.

Once in position, all movement should come from the hips. Twisting and turning from there will allow you to keep the gun level and your aim on point. Be careful that you aren’t shifting your back around while in position. I always like to keep my knees bent slightly, for that extra bit of added pop. If I need to do any height adjustment, it comes from the knees. I never lift my toes or ankles up off the ground – it is important to keep the feet level, flat, and comfortable. Toes should be able to jiggle but the feet shouldn’t actually move.

Any shift required to hone in on a target should be initiated by a twist of the hips. I encourage you to do a bit of stretching before heading to the range or out in the field. This will ensure that you are loose and won’t pull any muscles should you need to move slightly to zero in on a target.

3. Find the pocket

Let’s start here by lifting the right arm. If you aren’t already familiar with the pocket between your shoulder blade and neck, feel around until you find it. Before ever trying to fit your gun to the pocket, take a block of wood, a book, or some other firm object in your opposite hand and try to fit it into the pocket.

Once it’s in there, move around a bit. Find the positioning with the least pushback. Try to move your shoulder around in circles and ensure that the object doesn’t just slide right out or cause any discomfort.

When the gun is in there, it should have no problem staying there with the small bit of applied pressure from the other hand. The National Shooting Sports Foundation does a great job of showcasing fitting the gun to the shoulder, and realizing that you don’t have a gun fit problem, in the below video.

4. Consistency

Face should connect with the same spot on the gun each time. You want your eye to be right over the center of the rib, providing a clean line of vision. This shouldn’t impact either the comfort level of the gun in the pocket or the accuracy of the shot. In order to have consistency, you’ve got to have comfort.

This is a repeating theme that you’ll find in each of the tips I’ve provided here. The best way to shoulder a shotgun is also the most comfortable way to shoulder a shotgun. There shouldn’t be much pressure on the shoulder before the shot. During the shooting process, the movement of the gun should trigger a similar reaction from the body. It should be a slithering snake-like process.

The gun fires, the body reacts and moves with the shot, and then the posture is reset post-shot.

After the shot, you shouldn’t have pain the shoulder, wrist, or elsewhere. It should be as though not much has happened – the main thing going through your body should be excitement at making a great shot from the pocket.

Conclusion

Mitch Barrie

When asking yourself, ‘What is the best way to shoulder a shotgun,’ the correct answer is to find the pocket and then get yourself comfortable. These steps should help you to establish a solid, actionable stance that will increase both your accuracy and your comfort. Whether at the range or in the field, shouldering the shotgun correctly is as important as using the right ammo. Do some practice in your garage, and if necessary, have your gun personally fitted to you. Any gun shop can make this happen easily.

If you enjoyed this article, please share on your social channels. Education is key to top performance when shooting. Go ahead and post a picture of you in your shooting stance down below in the comments. I can’t wait to see what you’re shooting!

How to Move a Gun Safe: Best Way You Need to Know

It’s that dreaded moment. The time when you have to move a gun safe from one place to another. Gun safes are notoriously heavy and difficult to move, much like that furniture you inherited from Grandma. Everything about the process basically sucks, but it is doable. Follow this simple series of steps on how to move a gun safe and you’ll have that thing in its new location in no time.

How to move a gun safe

Initial Steps

Get the safe as light as possible by removing anything that doesn’t need to be inside.

Ammo, anything else that can be put in a separate box for now, should be taken out.

If moving to a new house, park the moving truck with the rear-facing either the sidewalk or driveway that you will be approaching from. Lower the ramp and be sure the path to get to the truck is made as easy as possible.

For larger safes, provide the team with worker gloves if they don’t already have some. I also find it helpful to provide pizza and beer to those that help me move – it seems to get everyone in a better mood and creates a team atmosphere. Here is a great video.

  • Cover walls, door openings, other furniture, and important items with scratch resistant material. Anything that the safe will pass by in the home should be protected.
  • Clear the path with which the safe will travel to an extra foot on each side, wherever possible. A bit of wobbling and curving will likely occur during transport. You don’t want anything to be struck by the safe should it or your team become frenzied.
  • Get a plank of wood or other solid object to act as a ramp if there are any steps leading from the front door to the vehicle or other area where the safe will be. If this doesn’t seem doable, you’ll need a couple extra people on the lower side as you move the safe down the step.

Moving Larger Gun Safes (over 3 feet tall, too heavy for one person to lift)

Gun safes are heavy in order to make them near impossible to steal should someone intrude into your home.

Moving them about is intentionally a process. I moved my 800-pound gun safe from our old house in Naples, Florida to our new spot in Lyndon, Washington and learned the hard way that gun safes aren’t the most transportable of items.

We spent an extra grand on gas on the drive because of the added weight. However, I picked up these tips:

  • Get a furniture dolly, or a forklift if you can. I recommend buying one from a home improvement store instead of renting or borrowing one. That way, you’ll have it whenever you need it.
  • When you’re ready to move, have a team of people stand on one side of the safe and lean it back. Slide the dolly underneath the safe and stabilize
  • I’ll note here that it is super important that the safe be balanced well on the dolly. Due to immense weight, it can fall over and crush individuals if not properly set. Here is a video on the process.
  • Ensure your path is cleared, and begin slowly moving the best gun safe out of the room.

Corners and Immovable Objects in the Way

Going around corners can be tough. The most important thing is to remain calm and proceed slowly. If you can, have a person position themselves on the far side of the safe (the side opposing the direction you are turning into) to provide added support from the back side. This person can forcefully push into the rear as the safe is moved around the corner. Go wide – by this I mean swing the dolly a bit further out than you initially think is necessary. That will allow the safe and dolly to be turned at an easier angle without striking the wall or toppling onto the person guarding the rear.

Loading into moving trucks/vehicles

Ready to exert some strength? Good, because this is the time to show off how those gym sessions have sculpted your muscles.

  • Assemble the entire team (add a few extra people if you can) at the bottom of the ramp leading into the back of the truck.
  • Everyone will need to position themselves comfortable behind the safe. If you have any truck straps, this is a great time to tie them around the safe and have one person stand in front of the safe and pull while everyone else pushes. While pulling won’t be super effective, the main benefit here is that this person acts as a sort of guide to ensure the safe doesn’t derail or fall off the dolly.
  • Once you start pushing the safe up the ramp, DON’T STOP! Momentum is the most important factor here. Get those grunts out and keep pushing. By the time you reach the top of the ladder, you will have enough momentum to easily move the gun safe into the desired position inside the truck.

Moving Smaller Gun Safes

With smaller ones, the process of how to move a gun safe is basically the same buy slightly less intense. Follow the above steps and make adjustments where necessary – you won’t need as many people or as much strength. If the safe can be carried, be sure to have at least two people for added support. Set the safe down gently and be mindful of doorways, walls, and protruding objects when passing through hallways. Do not set the safe on top of anything else – it’s weight may crush other objects.

Conclusion

best gun safe
This is one of the best gun safe

Now you know how to move a gun safe. The process is tough but can be enjoyable with friends and a good attitude. One thing to keep in mind is that when moving the gun safe to a new house, identify in advance the best location for the safe. In the garage or a room where it will not need to be moved ever again. If you enjoyed this article, please share. Knowledge is power, just like teamwork! If you have any tips or anything, feel free to leave them in the comments and we’ll get a discussion going. Check out my recent post about best ar10 scope

Do You Own a Shotgun? Let’s Find How To Aim A Shotgun

Finding the right stance and getting comfortable with aiming is something that all new shooters have to go through. It’s a fun process – it allows for a bit of personalization and flare to come into the sport.

When I first started hunting with my dad and uncle and a kid, it took me several times of going to the range and trying out new positions. Once I became comfortable, I began honing my aim.

While much of it is about feeling, there are some general guidelines to follow. Here are some tips for how to aim a shotgun.

Learning the Proper Stance

Spend any time hanging out at a gun range and you’ll likely see some interesting stances. Some stand straight and tall, others do weird things with their arms. My favorite is the old guy who stands with his feet super far apart – maybe he’s worried about knocking himself over when he takes a shot?

  • The best stance that will allow you to aim your shotgun easily is to put your feet between armpit length and shoulder-length apart. Much further than that and you’re lowering your line of vision and not optimizing for the best balance points. Closer together and you’re liable to blow yourself over on kickback.
  • Just over half of your weight should be on the front foot. Not too much, because you want to remain balanced and stable. But enough that your momentum is slightly forward. If too much is on the back foot, you’ll find that you shoot over the top a lot because you’re leaning back when the shot is taken.
  • Stand at a 45-degree angle to the target. This allows for comfortable and proper shotgun positioning.
  • I always recommend shooters do a bit of rocking back and forth. Lightly lift the toes in the process. This familiarizes you with the stance.
  • This video here goes over the basics to know how to aim a shotgun.

Finding your ‘Point of Aim’

Here is where a shooter can put a bit of their personal vibe into their shooting stance and shotgun aim.

Now you’re in your stance and working on the rocking motion. If you haven’t already been doing so, hold the gun in a shooting position during the rocking process. Notice where you feel most comfortable during the rock.

Likely, it will be right about where 55-60% of the weight is on the front foot. Once you’ve identified this position, STOP!

That is your natural point of aim. The object with this term, as it relates to how to aim a shotgun, is that this is the angle where you’ll shoot the target. This is where the bullseye will be directly in front, or where the clay will be broken by your bullet.

It’s important to remember that you’re not shooting a rifle. Don’t stand fully sideways with the gun near the shoulder. I prefer to have the stance a bit more open here.

Keep it flexible and position your head

When aiming your shotgun, the goal is to be able to shoot in more than one direction without becoming uncomfortable or urged to reset yourself. Make sure you are able to comfortably position your head above the barrel and hone in on the line of site.

  • I urge shooters to rock a bit every time they get settled into the stance. Come to the same final position the same way every time. Eventually it will be a habit.
  • Don’t pull your head off the stock. The shot should hit wherever the eyes are pointed. If you find yourself looking down at the barrel, or left-to-right or vice versa, focus on keeping your eyes and head positioned correctly.
  • Keep your feet planted when turning, and move with your upper body. Going back to the whole flexibility thing, following and aiming at a moving target should be an easy thing to do. It shouldn’t require you to jerk yourself around in a circle.
  • Don’t close your eyes. Train yourself to keep both eyes open during the shot. Depth perception is as important as anything else in relation to how to aim a shotgun.
  • Work on the mount and positioning on the shoulder. It shouldn’t be a painful thing when you pull the trigger. Slide the gun back and forth until you’re able to find a comfortable position.
  • Here is some advice on leading your target.

Conclusion

Aiming a shotgun is really about making the gun a part of your body. If it isn’t a natural stance, you’re never going to feel comfortable as a shooter. The right point of aim for you is the one that allows the most flexibility without compromising any sturdiness or power. Remember the rocking motion. I’ve been hunting for over fifty years now and still rock into my stance every single time.

COMSEVENTHFLT

Consider the best shotgun scope for your shotgun, it will help you have perfect shot with your shotgun!!!

If you’ve enjoyed this article, I urge you to share it on social media to help others get accustomed to finding the best possible stance and aiming their shotgun correctly. Feel free to leave any tips here in the comments, I’m always game for upping the ante a bit!

Featured Image via Torrey Wiley 

Which is Better Between .260 Remington vs 6.5 Creedmoor?

Do similar rounds produce similar results? Any experienced shooter will tell you that that is not always the case. For direct proof, look no further than the .260 Remington vs 6.5 Creedmoor. Both of these are a perfect match for the .308 Winchester rifle. In many cases, if you weren’t the one who loaded the rounds, you may not be able to even tell a difference.

My personal experience has led me to prefer the .260 Remington over the 6.5 Creedmoor. We’ll get into why in this article. I’m old school, is the main reason. This guy pretty much sums up my thoughts on the .260 Remington in this video:

The old classic vs. the new hotshot

.260 Remington is a classic among long-time riflemen, having been the backbone of what we’ve used for such a long time. The reason for this is that seasoned hunters have expertise in reloading. .260 Remington rounds necessitate this, while 6.5 Creedmoor rounds are better for those without that reloading expertise.

As many new hunters aren’t trained in the art of the reload, Creedmoor can significantly reduce the learning curve when looking to get out into the field. Additionally, the Creedmoor has a shoulder angle that is sharper than the Remington. This comes with less body taper

Additionally, less water is held by the Creedmoor. This won’t affect certain shooters, but it’s worth noting. It can fit a longer bullet because of this, but the general use of handheld cartridges has all but eliminated any benefit there. Here, a video description of the two takes place.

High performance vs. low performance, and vice versa

The brass on the .260 Remington is of a higher quality than the 6.5 Creedmoor. With the Creedmoor, you may find that the brass isn’t as long lasting. This affects hunters as they experience less overall durability and flow with their shooting than if they were to use the .260 Remington.

The Creedmoor’s case is a bit shorter than the .260 Remington’s. The Remington is undoubtedly faster as a result of the higher case capacity, necessitating less maintenance in the field. Remingtons are better for those looking to use a bolt gun, but for the semi-automatic inclined, the 6.5 Creedmoor is the better choice. I’m always using bolt, so the Remington works for me.

When it comes to distance shooting, the Remington will be solid up to at least 800-900 yards.

Personal preference and skill level are a big factor

Beyond that, the accuracy can lose a bit of its dependability depending on skill and build. I’ve got mine accurate up to 1000, but I’ve been doing this for a long time. I will concede that the Creedmoor can perfectly nail a target from 1000 yards when built the right way and taken good care of. If everything is prepped correctly, that is the better option for really long distances.

I recommend keeping a chart of data from the rounds you fire with both. Test them out, and through your charts you can identify which one you are more accurate with, and which one makes the overall process easier for you. Keep track of powder, distance, velocity, and muzzle energy. I also encourage testing at different distances. Keep a record of 100 yard accuracy percentage compared with longer shots. Those who are new to long distance shooting should stick with the choice that they are the most comfortable with.

I also encourage shoots to watch some videos online of different practices with both options. Here are a couple great options:

  • Creedmore footage
  • Remington footage
https://www.youtube.com/watch?v=SXTFkpIUz9k


Conclusion

At the end of the day, it really depends on personal preference. Take into consideration which bullets you plan to shoot, and whether or not you are willing to switch them to accommodate aesthetics or if you are hard lined on performance and personal comfort.

I’ve grown so accustomed to the .260 Remington over the decades that I’m not going to be switching anything up at this point.

If you enjoyed this article, please share on social media – us gun freaks always love a good debate on equipment.

Feel free to share your personal opinions in the comment section here, as I’m sure we’ve got a community of 6.5 Creedmoor users out there that have thoughts on the matter.

Featured Image via Madison Scott-Clary

Visit Us On FacebookVisit Us On PinterestCheck Our Feed